


Sweet, Petite & Perfect for Afternoon Tea
There’s something undeniably charming about Vanilla Butterfly Fairy Cakes—those light, golden sponge cakes with delicate “wings” and a sweet dollop of cream and jam nestled in the center. Whether you call them butterfly cakes or fairy cakes, these little beauties are a nostalgic favourite in British baking, perfect for children’s parties, elegant teas, or simply when you want a treat that feels a little bit magical.
I first made these as a child, helping my nan in the kitchen on rainy afternoons. She always let me slice the cake tops (with great care!) and arrange the wings just so. It was like edible origami, and I still remember how proud I was of my wonky little butterfly cakes. Fast-forward a few years, and they’re still one of my favourite things to whip up when I want something simple but joyful.
These cakes are incredibly easy to make, with a soft vanilla sponge base and a classic jam-and-cream filling. You can use whipped cream for a lighter version or buttercream if you want something a bit richer. Either way, they’re delicious—and absolutely adorable.
Let’s get baking!
Ingredients
For the Cakes:
-
150g unsalted butter, softened
-
150g caster sugar
-
3 large eggs, room temperature
-
1 tsp vanilla extract
-
150g self-raising flour
-
1 tbsp milk
For the Decoration:
-
200g whipped cream or buttercream
-
2 tbsp strawberry or raspberry jam
-
Icing sugar, for dusting
Step 1: Make the Batter
Start by preheating your oven to 180°C (160°C fan) / 350°F and lining a 12-hole cupcake tin with paper cases.
In a large bowl, beat the butter and sugar together for about 5 minutes until pale and fluffy. Don’t skimp on this step—it’s the key to that light sponge texture.
Crack in the eggs one at a time, mixing well and adding a tablespoon of flour with each to help prevent curdling. Stir in the vanilla extract, then gently fold in the remaining flour until just combined. Add 1 tbsp of milk to loosen the batter slightly.
Tip: Be careful not to overmix once the flour goes in—that’s how you keep them soft and airy.
Step 2: Bake the Cakes
Divide the mixture evenly between the cupcake cases, filling each one about halfway. Bake in your preheated oven for 15–18 minutes, or until the tops are golden and spring back lightly when touched.
Remove from the oven and allow the cakes to cool in the tin for 5 minutes, then transfer them to a wire rack to cool completely.

Cut, Fill & Assemble Your Butterflies
Now for the fun part—turning your ordinary cupcakes into beautiful little butterflies.
Step 3: Create the “Wings”
Once the cakes are completely cool, use a small knife to cut a shallow cone-shaped piece out of the top of each cake (like you’re coring a cupcake). Slice the removed cone in half—these will be your wings.
Don’t worry if they’re not perfectly even—part of the charm is in their homemade look!
Step 4: Fill & Decorate
Spoon about ½ teaspoon of jam into the hole of each cake, followed by a small swirl or dollop of whipped cream or buttercream.
Take your two “wing” pieces and press them gently into the cream at an angle, so they sit upright like butterfly wings. Give each one a light dusting of icing sugar just before serving for a pretty, fairy-like finish.
Optional Variations:
-
Lemon version: Use lemon zest in the sponge and lemon curd instead of jam.
-
Chocolate twist: Add cocoa powder to the batter and fill with chocolate spread and cream.
-
Mini versions: Use a mini muffin tray for bite-sized butterfly cakes—great for kids’ parties!
FAQ & Final Thoughts
Frequently Asked Questions
1. Can I make these ahead of time?
The sponge can be baked a day in advance, but it’s best to fill and assemble them on the same day as the cream can soften the cakes.
2. Can I use buttercream instead of whipped cream?
Absolutely! Buttercream holds up better if you’re making them ahead and adds a richer flavour.
3. How do I store leftover cakes?
Store in the fridge for up to 2 days if filled with cream. Let them come to room temp before serving.
4. Can I freeze them?
You can freeze the unfilled cakes for up to 1 month. Defrost and decorate before serving.
5. Are these fairy cakes or cupcakes?
In the UK, they’re traditionally called fairy cakes—smaller and lighter than American-style cupcakes.
6. Can I make these gluten-free?
Yes! Use a gluten-free self-raising flour blend. Just make sure your other ingredients (especially jam and vanilla) are also gluten-free.
7. What can kids help with?
Let them spoon in jam, swirl the cream, and place the wings—this is a great bake to do with little hands.
Final Thoughts
These Vanilla Butterfly Fairy Cakes are the definition of sweet, simple joy. They’re soft, fluffy, and filled with just the right amount of jam and cream—perfect for a tea party, a bake sale, or just because you feel like something whimsical and lovely.
They’re the kind of treat that brings people together and makes you feel like a kid again—whether you’re baking them for your little ones or sneaking one yourself with a quiet cuppa.
Have you made butterfly cakes before? I’d love to hear how you decorate yours—drop your favourite combos in the comments!
Print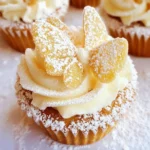
Vanilla Butterfly Fairy Cakes – Classic British Tea Party Treats with Cream & Jam
- Total Time: 35 minutes
Description
These Vanilla Butterfly Fairy Cakes are a timeless British treat made with soft, fluffy sponge, filled with sweet jam and cream, and topped with delicate “butterfly wings” made from the cake tops. Perfect for tea parties, birthdays, or nostalgic baking sessions, they’re easy to make, fun to decorate, and always a crowd-pleaser. Whether you’re baking with kids or creating an elegant afternoon tea spread, these little cakes are a delightful addition.
Ingredients
For the Cakes:
-
150g unsalted butter, softened
-
150g caster sugar
-
3 large eggs, room temperature
-
1 tsp vanilla extract
-
150g self-raising flour
-
1 tbsp milk
For the Decoration:
-
200g whipped cream or buttercream
-
2 tbsp strawberry or raspberry jam
-
Icing sugar, for dusting
Instructions
-
Preheat the oven:
Preheat to 180°C (160°C fan) / 350°F. Line a 12-hole cupcake tin with paper cases. -
Make the batter:
Beat butter and sugar together for about 5 minutes until pale and fluffy. Add eggs one at a time, with a spoonful of flour to prevent curdling. Stir in vanilla, then fold in remaining flour. Add milk to loosen the batter. -
Bake:
Divide batter evenly between cases (fill halfway). Bake for 15–18 minutes until golden and springy. Cool in tin briefly, then transfer to wire rack. -
Create “wings”:
Once cool, cut a shallow cone from the top of each cake. Slice the cone in half to make two wing-shaped pieces. -
Fill and decorate:
Add a small spoonful of jam and a dollop of whipped cream or buttercream into the hole. Press the two cake halves into the cream at an angle to create butterfly wings. -
Finish:
Dust lightly with icing sugar and serve.
Notes
-
Storage: Best eaten the same day due to the cream. Store in the fridge if needed, and bring to room temp before serving.
-
Buttercream holds up better if preparing in advance.
-
Use any jam you like—raspberry and strawberry are classics, but lemon curd or apricot work too.
-
For a fun twist: Add a drop of food colouring to the sponge or decorate with sprinkles.
-
Great for kids: Let them help decorate and place the wings!
- Prep Time: 20 minutes
- Cook Time: 15 minutes


")