


A Slice of British Nostalgia and the First Steps to Bake It
There’s something so comforting about the scent of a freshly baked jam slice wafting through the kitchen. It’s one of those old-fashioned British bakes that instantly takes you back to simpler times — when tea was always served in proper china cups, and a tray of homemade treats sat proudly on the counter waiting for visitors.
My Nan’s jam slice was legendary in our family. She never measured perfectly, never fussed with fancy ingredients — just butter, sugar, eggs, flour, and a jar of jam that she’d probably made herself the summer before. Yet somehow, every time, it came out golden on top, sticky in the middle, and just the right amount of chewy at the edges. It’s the sort of bake that makes you pause, smile, and reach for a second slice without even thinking about it.
So today, I’m sharing this Traditional British Jam Slice — a traybake that’s beautifully simple, delightfully nostalgic, and practically made for a good cup of tea. It’s buttery, sweet, and just the right balance of sponge, jam, and coconut crunch.
Let’s get baking.
Ingredients You’ll Need
For the base:
-
150g unsalted butter, softened
-
150g caster sugar
-
2 large eggs
-
150g self-raising flour
-
1 tsp vanilla extract
-
200g raspberry or strawberry jam
For the coconut topping:
-
100g desiccated coconut
-
50g caster sugar
-
1 large egg
Step 1: Prep and Preheat
Start by preheating your oven to 180°C (fan). Line a rectangular tin (around 20 x 30cm) with baking parchment. I like to let the paper hang slightly over the edges — it makes lifting the slice out later so much easier.
A good jam slice begins with a smooth, fluffy base. In a mixing bowl, cream together the butter and caster sugar until the mixture turns pale and light. You can use an electric mixer here, but if you’re feeling traditional, a wooden spoon works beautifully too (and gives you a nice arm workout!).
Step 2: Mix in the Wet Ingredients
Next, beat in the eggs, one at a time. Make sure the first egg is fully combined before adding the second — this helps keep your batter smooth instead of curdled. Stir in a teaspoon of vanilla extract, which adds that subtle warmth and aroma that makes the sponge taste so inviting.
Step 3: Fold in the Flour
Now for the flour. Gently fold in the self-raising flour until you have a soft, even batter. It should be thick enough to spread but not too stiff — think the consistency of a classic sponge cake mix. Spread the batter evenly into your prepared tin, making sure it reaches all the corners.
At this point, your kitchen will already smell like baking magic — that buttery-sweet scent that makes everyone wander in asking what’s in the oven.
Step 4: Spread the Jam
Take your chosen jam — raspberry or strawberry is the traditional choice — and spread it gently over the sponge base. Go all the way to the edges, so every slice gets a perfect hit of fruit.
If you’ve ever tried spreading jam on cake batter, you’ll know it can get a little messy. Here’s a trick from Nan: slightly warm the jam before spreading, or use the back of a spoon that’s been dipped in hot water. It glides beautifully and keeps the layers neat.
Creating the Coconut Topping and Baking to Perfection
Now comes the part that really makes this jam slice shine — the golden coconut topping. It’s sweet, slightly chewy, and adds the most beautiful contrast to the soft sponge and sticky jam underneath.
Step 5: Make the Coconut Topping
In a separate bowl, combine 100g of desiccated coconut, 50g of caster sugar, and 1 large egg. Stir everything together until you have a sticky, slightly crumbly mixture. You want the egg to just bind the coconut and sugar — not make it soupy. If it feels too wet, add a tablespoon more coconut.
Step 6: Add the Topping
Now, dot spoonfuls of the coconut mixture over the jam layer, then gently spread it out with the back of a spoon. Don’t worry if it’s not perfectly smooth — a little unevenness gives that lovely rustic look once baked.
Here’s another trick: wet your spoon slightly before spreading. It stops the coconut from dragging the jam underneath, keeping those layers distinct and tidy.
Step 7: Bake
Slide your tray into the preheated oven and bake for 25–30 minutes, or until the top turns a gorgeous golden brown and the centre is just set.
The smell that fills your kitchen? Pure heaven. Sweet, buttery, and toasted — like the promise of tea time wrapped up in one scent.
Step 8: Cool and Slice
Once baked, take the tin out and let it cool completely in the pan. The jam layer will firm up a bit as it cools, making it much easier to slice. When ready, lift the whole thing out using the parchment, place it on a cutting board, and cut into squares or bars.
That first slice — the one with a bit of jam oozing out and coconut flakes tumbling off — is always the baker’s reward. Go on, you’ve earned it.
Tips and Variations
-
Switch up the jam: Try apricot, plum, or even blackcurrant for a bold twist.
-
Go dessert-style: Warm it slightly and top with a scoop of vanilla ice cream.
-
For extra chewiness: Add a tablespoon of golden syrup to the coconut topping.
-
Make ahead: These store beautifully in an airtight tin for up to 4 days — perfect for lunchboxes or picnics.
This jam slice is simplicity itself, but every bite feels special — sweet, buttery, fruity, and just a little nostalgic.
FAQs and a Sweet Conclusion
Frequently Asked Questions
1. Can I use fresh fruit instead of jam?
Yes! If you’ve got ripe berries, you can simmer them down with a little sugar to make a quick, thick compote. Just make sure it’s not too runny before spreading.
2. What’s the best jam for a traditional British slice?
Raspberry jam is the classic choice — slightly tart and vibrant — but strawberry works wonderfully too. For something more old-fashioned, try plum or damson jam.
3. Can I make this gluten-free?
Absolutely. Substitute the self-raising flour with a gluten-free self-raising blend. Just be aware that the texture may be a little softer.
4. How do I stop the jam from seeping into the sponge?
Spread the batter evenly and let it rest for a minute before adding the jam. A slightly thicker layer of jam also helps form a clean separation.
5. Can I freeze jam slice?
Yes, once completely cooled, wrap the slices tightly in cling film and freeze for up to a month. Defrost at room temperature before serving.
6. Why did my topping sink into the jam?
If your jam is too thin or your coconut mixture too wet, they can blend together. Try using a thicker jam next time and lightly spread the coconut without pressing too hard.
7. Can I double the recipe for a larger crowd?
Definitely! Just use a bigger tray and increase the baking time by 5–10 minutes, watching for that perfect golden top.
A Sweet Ending
And there you have it — the Traditional British Jam Slice, the kind of bake that never goes out of style. It’s humble yet irresistible, the perfect balance of soft sponge, sticky jam, and that irresistible chewy coconut crust.
What I love most about this recipe is how unpretentious it is. No fancy techniques or rare ingredients — just simple home baking at its finest. Whether you’re serving it with tea, popping it into lunchboxes, or sneaking a piece at midnight (we’ve all done it), this jam slice delivers every single time.
If you try this recipe, I’d love to hear how it turns out. Did you stick to raspberry, or try something daring like apricot or blackcurrant? Leave a comment and share your twist — that’s how family favorites evolve into new traditions.
Here’s to buttery crumbs, sweet jam, and the kind of recipes that make a house feel like home.
Print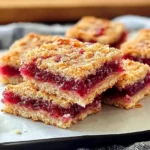
Traditional British Jam Slice Recipe: A Classic Coconut and Jam Traybake Just Like Nan Used to Make
- Total Time: 45 minutes
Description
This Traditional British Jam Slice is a true classic — a soft, buttery sponge layered with fruity jam and topped with a golden, chewy coconut crust. Simple, nostalgic, and utterly delicious, this traybake is perfect for afternoon tea, picnics, or lunchbox treats. With its easy steps and classic ingredients, it’s just like the one Nan used to make — comforting, sweet, and full of home-baked charm.
Ingredients
For the Base:
-
150g unsalted butter, softened
-
150g caster sugar
-
2 large eggs
-
150g self-raising flour
-
1 tsp vanilla extract
-
200g raspberry or strawberry jam
For the Coconut Topping:
-
100g desiccated coconut
-
50g caster sugar
-
1 large egg
Instructions
-
Preheat the oven:
Set the oven to 180°C (fan). Line a 20 x 30cm rectangular tin with baking parchment. -
Make the sponge base:
In a mixing bowl, cream together the butter and sugar until pale and fluffy.
Beat in the eggs one at a time, then stir in the vanilla extract. -
Add the flour:
Fold in the self-raising flour gently until combined. Spread the mixture evenly into your prepared tin. -
Add the jam layer:
Gently spread the jam over the sponge base, going right to the edges.
(Tip: warm the jam slightly to make spreading easier.) -
Prepare the coconut topping:
In another bowl, mix the desiccated coconut, sugar, and egg until combined into a sticky mixture. -
Layer and bake:
Dot the coconut topping over the jam, spreading gently with the back of a spoon.
Bake for 25–30 minutes, or until golden on top and just set in the center. -
Cool and slice:
Allow the slice to cool in the tin, then lift it out and cut into squares or bars.
Notes
-
Jam options: Raspberry is classic, but strawberry, apricot, or blackcurrant are all delicious alternatives.
-
Spreading tip: Wet the back of your spoon slightly before spreading the coconut mixture — it prevents dragging the jam layer.
-
Storage: Keeps well in an airtight container for up to 4 days.
-
Serving idea: Enjoy warm with vanilla ice cream or a dollop of cream for dessert.
-
Freezing: Once cooled, wrap and freeze for up to 1 month. Defrost fully before serving.
- Prep Time: 15 minutes
- Cook Time: 30 minutes


")