A Sweet Slice of Nostalgia (The Recipe Begins!)
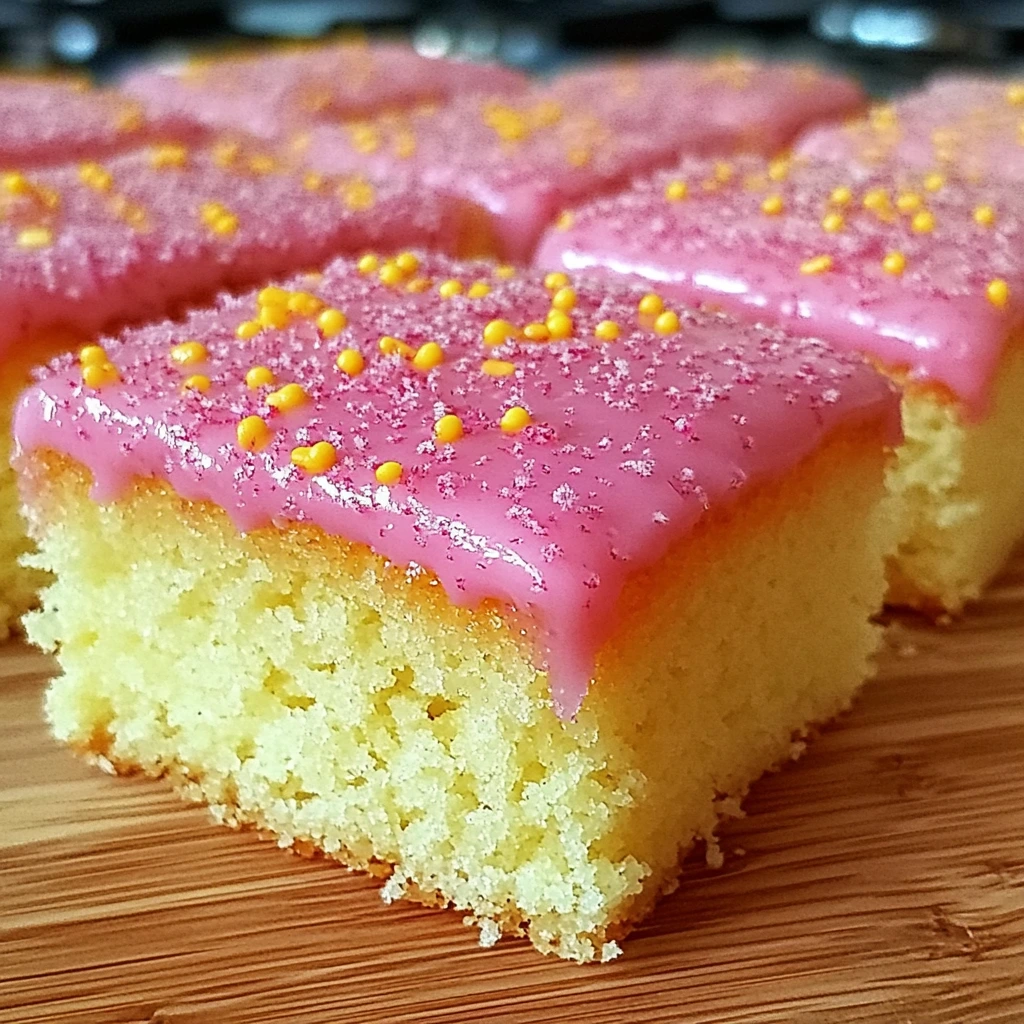
There’s just something about this classic School Dinner Sponge Cake with Pink Icing that makes us feel like kids again. If you ever queued up in a noisy school hall, tray in hand, eyes wide at the sight of a wobbly pink-topped sponge square being dished up beside a puddle of hot custard—then you know exactly the kind of magic we’re baking today.
I still remember the delight of biting into that fluffy, buttery sponge, the sugary icing melting just enough from the warmth of the custard. And while it’s been years since I wore a school uniform, I’ve never grown out of loving this cake. It’s one of those recipes that’s simple to make, full of charm, and always brings a smile—whether you’re serving it for a family tea, a bake sale, or just because it’s a Wednesday and you need a sweet treat.
So today, we’re going to whip up this nostalgic bake—complete with that signature soft pink icing and sprinkles. It’s quick, it’s comforting, and yes, it’s absolutely allowed to serve it with custard at home.
Let’s get baking!
🍰 Ingredients for the Sponge:
-
Unsalted butter: 200g, softened
-
Caster sugar: 200g
-
Medium eggs: 4
-
Vanilla extract: 1 tsp
-
Self-raising flour: 200g
-
Milk: 2 tbsp (to loosen the batter)
🎀 Ingredients for the Icing:
-
Icing sugar: 250g
-
Pink food colouring: a few drops
-
Water: 3–4 tbsp (as needed)
-
Sprinkles: to decorate
🧁 Step-by-Step: Making the Sponge
1. Preheat and Prepare
First things first—preheat your oven to 160°C (fan). This slightly lower temperature helps the sponge bake evenly without browning too quickly.
Line a 20x30cm rectangular or square baking tin with parchment paper. If you’ve got an old-school enamel tray, even better for that retro feel!
2. Cream It Up
In a large mixing bowl, beat together 200g of softened butter and 200g of caster sugar until the mixture is pale, fluffy, and light. You’re looking for that classic creamy consistency—this helps make your sponge beautifully soft.
3. Add the Eggs
Crack in your eggs one at a time, beating well between each addition. This keeps the batter smooth and stops it from splitting. Add 1 teaspoon of vanilla extract for a lovely background note of sweetness. If you’re after that old-school almondy vibe, feel free to swap the vanilla for a few drops of almond extract here!
4. Fold and Finish
Gently fold in 200g of self-raising flour, taking care not to overmix—you want a nice light sponge. Finally, stir in 2 tablespoons of milk to loosen the batter a little. It should be smooth and drop easily from a spoon.
5. Bake to Perfection
Pour your batter into the lined tin and level the top with a spatula or the back of a spoon. Pop it in the oven and bake for 25–30 minutes, or until it’s risen, lightly golden, and springs back when gently pressed.
Let the cake cool completely in the tin before moving on to the icing—this is key to keeping the topping nice and smooth.
Coming up next: We’ll whip up that iconic pink icing, add a few tips for making it your own, and of course, cover the sprinkles situation. Because let’s be honest: there’s no such thing as too many.
That Iconic Pink Icing & All the Retro Vibes
Now that your sponge is baked and cooling (and hopefully filling your kitchen with those buttery-sweet aromas), it’s time to make the part we’ve all been waiting for—that unmistakable, pastel-pink icing.
There’s just something about that sugary shell on top of a fluffy sponge that instantly says “school pudding,” isn’t there? It’s not fancy, not fiddly, but that’s exactly what makes it so lovable. A few drops of pink food colouring, a generous shake of sprinkles, and you’re basically back in the lunch hall with your friends, swapping snacks and hoping for seconds.
Let’s dive into that sugary goodness and get this cake finished!
🎨 Making the Pink Icing
Ingredients Recap:
-
Icing sugar: 250g
-
Pink food colouring: a few drops (gel food colouring works best)
-
Water: 3–4 tbsp (added slowly)
-
Sprinkles: for decorating (as many as your heart desires)
6. Whisk It Together
Start by sifting the icing sugar into a mixing bowl. This helps prevent lumps and gives you that smooth, glossy finish.
Now, add a few drops of pink food colouring to the sugar, and then begin to add the water very gradually, about a tablespoon at a time. Mix until you have a thick but spreadable icing. You want it to be pourable, but not so thin that it runs off the cake—think soft-peak icing, if there is such a thing!
💡 Tip: Use gel food colouring if you have it—liquid food colour can thin the icing a bit too much. If your icing goes too runny, just sift in a bit more icing sugar until the texture feels right.
7. Ice the Cake
Once the sponge has completely cooled, pour or spoon your icing over the top. Use a spatula or the back of a spoon to spread it evenly across the surface. It should sit nicely on top without sinking in.
Don’t wait too long—add your sprinkles right away before the icing sets. You can go traditional with rainbow hundreds and thousands, or try sugar stars, pastel shapes, or even edible glitter if you’re feeling extra.
Let the icing set at room temperature—this usually takes about 30 minutes to an hour depending on your kitchen’s humidity.
8. Slice and Serve
Once the icing is firm to the touch, cut the cake into squares. You’ll typically get about 12 generous slices, but feel free to cut them smaller for lunchboxes or parties.
💡 Extra Tips & Variations
-
Go Custard-Crazy: Want that full retro experience? Warm up some thick custard and serve a big dollop over each slice. This is exactly how it was served in school—and honestly, it’s just as dreamy today.
-
Add a Twist: Swap the vanilla extract in the sponge for almond extract for that old-fashioned, marzipan-like kick. Just a few drops go a long way!
-
Gluten-Free Option: Use a good-quality gluten-free self-raising flour blend and check your sprinkles are GF-friendly. Everything else stays the same!
-
Make It Ahead: This sponge keeps really well—store it in an airtight container at room temperature for up to 4 days. It might even taste better the next day, once the icing has settled in.
-
Kid-Friendly Fun: Let little hands go wild with decorating! Give them bowls of different sprinkles and let them each design their own square.
The beauty of this cake is how unfussy it is. It’s sweet, soft, and straightforward—but that doesn’t mean it’s boring. Whether you’re baking for nostalgia or sharing this slice of British teatime with a new generation, you really can’t go wrong.
In Part 3, we’re tackling the most common questions—like whether you can freeze it, how to get the perfect texture, and what to do if your icing goes rogue. Then we’ll wrap up with a few final thoughts and serving ideas.
👉 Keep reading for the FAQ and conclusion!
FAQs, Final Tips & That Last (Delicious) Slice
By now, your cake should be sitting pretty—topped with sweet pink icing and scatterings of colourful sprinkles. Whether it’s cooling on the counter or already plated up with a drizzle of custard, this School Dinner Sponge Cake with Pink Icing is exactly the kind of nostalgic comfort we all need now and then.
But before you slice into those final squares, let’s go over some frequently asked questions, just in case you need a bit of extra help the next time you bake it—or if something didn’t go quite to plan.
🍴 Frequently Asked Questions
1. Can I freeze School Dinner Sponge Cake?
Yes, you can! It freezes best before the icing is added. Just wrap the sponge tightly in cling film and foil, then freeze for up to 3 months. When ready to serve, thaw at room temperature and ice once defrosted.
2. What if I only have plain flour?
No problem! Just use 200g of plain flour and add 2 tsp of baking powder to create your own self-raising blend. Make sure to mix it well before folding into your batter.
3. Can I make this as a round cake instead?
Definitely! You can bake this in two 8-inch round tins to make a sandwich-style sponge. Adjust the baking time slightly—start checking around 20–25 minutes.
4. My icing is too runny—how can I fix it?
Add more sifted icing sugar, a tablespoon at a time, until it thickens to a spreadable consistency. Always add water slowly and in small amounts to avoid thinning it too much in the first place.
5. Is it okay to make this cake a day ahead?
Absolutely. This sponge holds up beautifully overnight. In fact, the icing sets perfectly and the texture softens just a touch, making it even more moist the next day.
6. Can I use margarine instead of butter?
Yes, you can substitute a good-quality baking spread or margarine for the butter. Just make sure it’s at room temperature and suitable for baking.
7. Do I need an electric mixer for this cake?
An electric mixer makes creaming the butter and sugar easier, but it’s not essential. You can use a wooden spoon and a bit of elbow grease—it just might take a little longer.
🎉 Final Thoughts
This School Dinner Sponge Cake with Pink Icing really is the best kind of baking—simple, nostalgic, and downright fun. It doesn’t ask for fancy ingredients or special equipment. Just a bowl, a spoon, and maybe a bit of time to linger over the memories it brings.
So the next time you’re in the mood for a sweet trip down memory lane—or want to introduce the kids to a proper slice of old-school joy—this cake delivers every time.
Don’t forget to tag your photos or drop a comment if you try this recipe—I’d love to hear how you served it (with custard? With tea? With both?). And if you added a twist—like almond extract, jam between layers, or extra sprinkles—let’s hear about it!
Happy baking, and here’s to more pink-iced puddings in our lives.
Print
Retro School Dinner Sponge Cake with Pink Icing and Sprinkles – A British Classic!
- Total Time: ~1 hour 20 minutes
Description
Take a trip down memory lane with this School Dinner Sponge Cake with Pink Icing. A fluffy vanilla sponge, topped with smooth, pastel-pink icing and sprinkles, this traybake is the perfect treat for family tea time or bake sales. Just like the ones served with hot custard in school canteens, this easy recipe is packed with nostalgic flavour—and ready in under an hour.
Ingredients
For the Sponge:
-
200g unsalted butter, softened
-
200g caster sugar
-
4 medium eggs
-
1 tsp vanilla extract (or almond extract for a twist)
-
200g self-raising flour
-
2 tbsp milk
For the Icing:
-
250g icing sugar, sifted
-
3–4 tbsp water
-
A few drops pink food colouring
-
Sprinkles, to decorate
Instructions
1. Preheat & Line:
Preheat oven to 160°C fan. Line a 20x30cm baking tin with parchment paper.
2. Cream Butter & Sugar:
Beat butter and sugar together until light and fluffy.
3. Add Eggs & Vanilla:
Add eggs one at a time, beating between each. Stir in vanilla extract.
4. Fold in Flour & Milk:
Fold in self-raising flour gently, then add milk to loosen the batter.
5. Bake:
Pour batter into the tin, level the top, and bake for 25–30 minutes, until golden and springy.
6. Cool:
Let the sponge cool completely in the tin before icing.
7. Make Icing:
Mix icing sugar with pink food colouring and water until smooth and thick.
8. Ice & Decorate:
Spread icing over the cooled sponge and add sprinkles immediately. Let set for 30–60 minutes.
9. Slice & Serve:
Cut into 12 squares and enjoy—bonus points if you serve with custard!
Notes
-
Store in an airtight container for up to 4 days at room temperature.
-
Can be frozen (without icing) for up to 3 months.
-
For a lighter sponge, don’t overmix once the flour is added.
-
This recipe is super kid-friendly—perfect for getting little ones involved!
- Prep Time: 20 minutes
- Cool + Ice Time: ~30 minutes
- Cook Time: 30 minutes


