

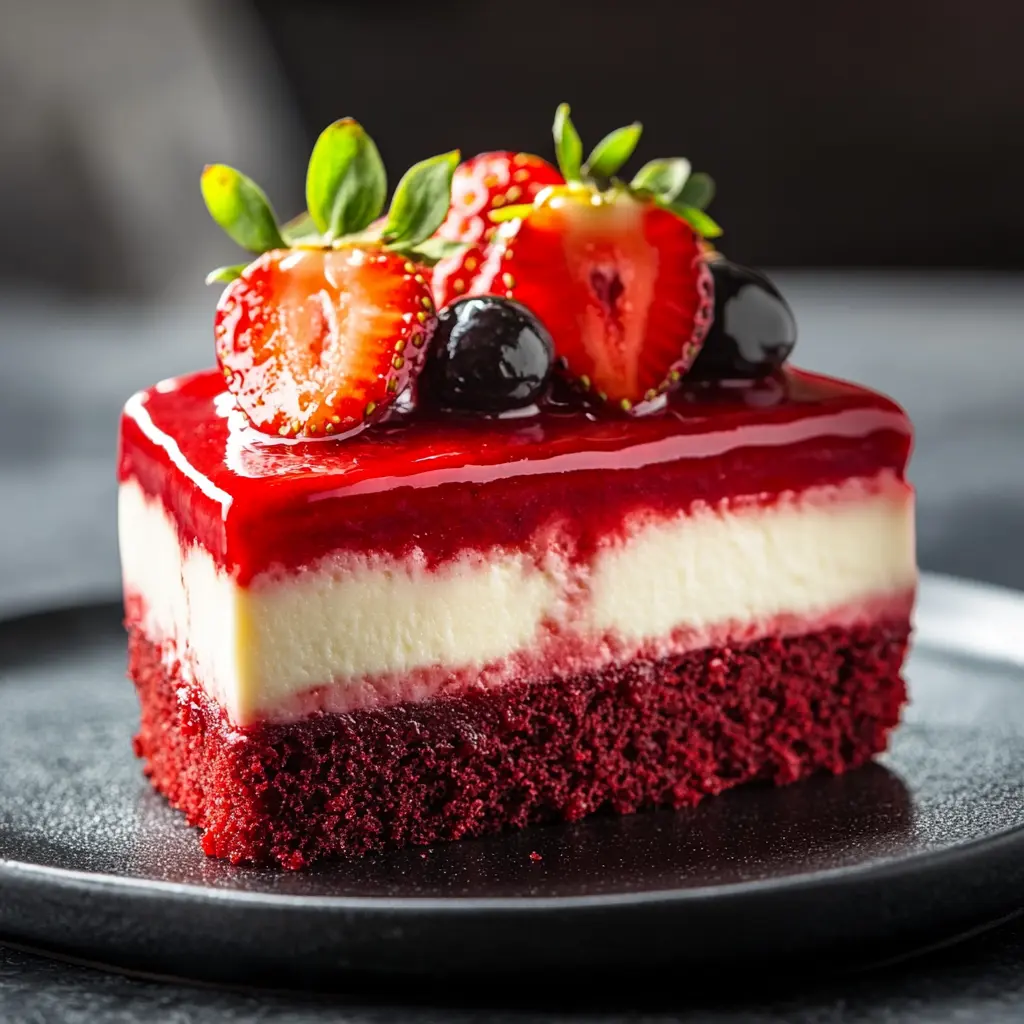
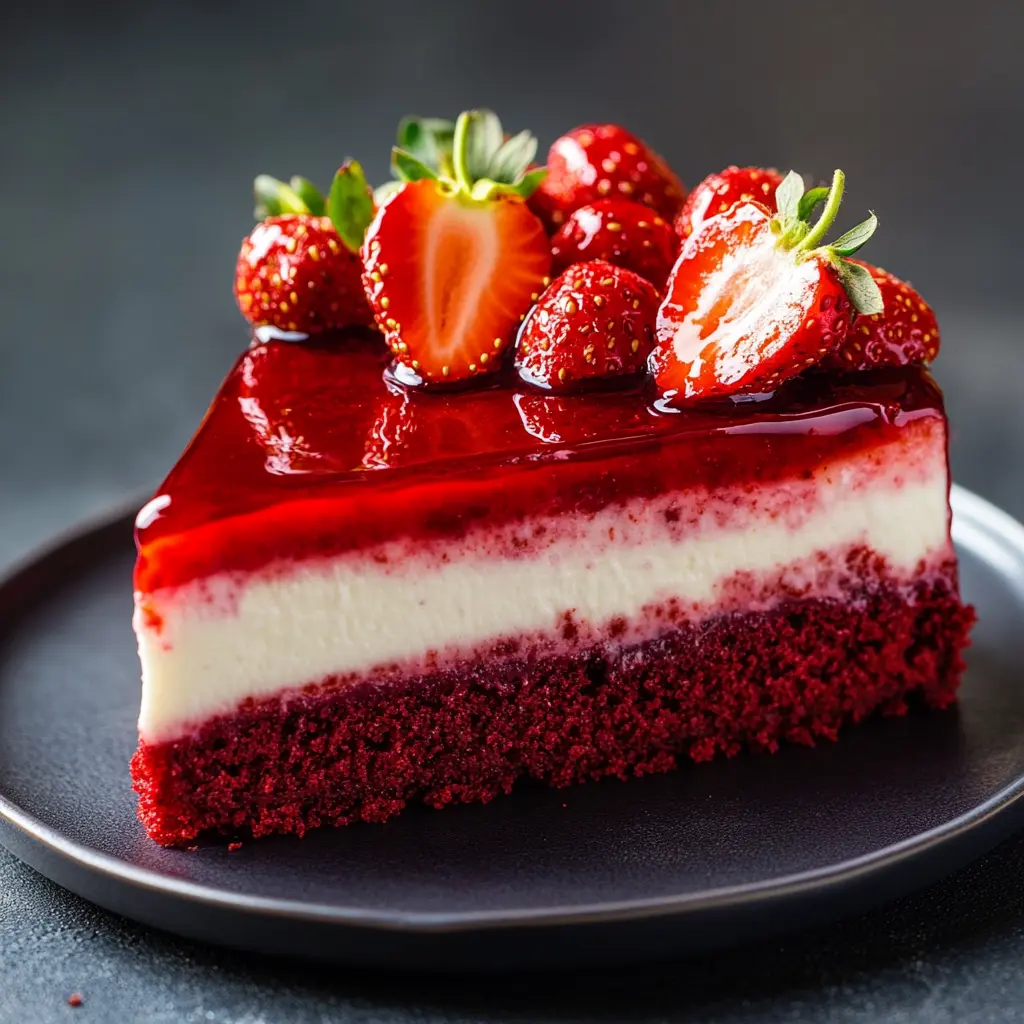
Red Velvet Strawberry Cheesecake is a show-stopping dessert that combines the best of three worlds: the rich, cocoa-infused elegance of red velvet cake, the creamy indulgence of classic cheesecake, and the sweet, tangy freshness of strawberries. This layered masterpiece is not just a treat for the taste buds but also a feast for the eyes, with its vibrant red hue, luscious cream cheese filling, and glossy strawberry topping.
Why is Red Velvet Strawberry Cheesecake Popular?
This dessert is a favorite for special occasions like birthdays, Valentine’s Day, anniversaries, and holiday gatherings. The contrast of flavors and textures makes it irresistible—moist and slightly tangy red velvet cake paired with silky cheesecake and finished with a fruity, slightly tart strawberry layer. The balance of sweetness and acidity ensures that every bite is rich yet refreshing.
Additionally, the aesthetic appeal of this cheesecake makes it a social media favorite. Whether topped with fresh strawberries, drizzled with chocolate, or garnished with whipped cream, it’s a visually stunning dessert that impresses guests.
What Makes This Recipe Unique?
Unlike a traditional red velvet cake, which is usually paired with cream cheese frosting, this recipe takes it a step further by incorporating a full cheesecake layer instead of just frosting. The creamy texture of the cheesecake complements the cake’s slightly dense crumb, creating a harmonious bite. The addition of a homemade strawberry topping enhances the flavor profile, adding a fruity brightness that cuts through the richness.
Whether you’re an experienced baker or trying this as a fun kitchen experiment, Red Velvet Strawberry Cheesecake is a rewarding dessert that will leave everyone asking for seconds. In this guide, we’ll cover everything from its history to a step-by-step recipe and expert baking tips to ensure your cheesecake turns out perfect every time.
The History of Red Velvet and Cheesecake
Red Velvet Strawberry Cheesecake is a fusion of two iconic desserts: red velvet cake and cheesecake. Both have fascinating histories that span centuries and cultures, evolving into the beloved treats we know today.
The Origins of Red Velvet Cake
Red velvet cake dates back to the 19th century, when cocoa was often added to cakes to create a softer, more “velvety” texture. The original red color was not as vibrant as today’s version—it came from a natural reaction between cocoa powder and acidic ingredients like vinegar or buttermilk.
During the Great Depression, the cake gained popularity thanks to the Adams Extract Company, which introduced bottled red food coloring to enhance its color. They marketed red velvet cake as a luxurious treat, making it a hit in American households. Over time, cream cheese frosting replaced the traditional ermine frosting, becoming a signature pairing.
Red velvet cake became a cultural icon, appearing in Hollywood films and high-end bakeries. It experienced a resurgence in the 2000s, becoming a staple for weddings, birthdays, and special events.
A Brief History of Cheesecake
Cheesecake has an even older history, dating back to ancient Greece. The first recorded cheesecakes were served to athletes during the Olympic Games in 776 BC, as they were believed to provide energy. The Romans later adapted the recipe, spreading it across Europe.
By the 18th century, cheesecake had evolved, and different countries developed their own versions. The American-style cheesecake, known for its dense and creamy texture, became popular in the 1900s when cream cheese was invented. The famous New York-style cheesecake, made with extra egg yolks and a smooth texture, became the gold standard.
The Fusion of Red Velvet and Cheesecake
The idea of combining red velvet cake with cheesecake likely emerged in the late 20th or early 21st century, driven by the demand for creative and indulgent desserts. The pairing works because of the contrast in flavors (mild cocoa vs. tangy cream cheese) and textures (moist cake vs. dense cheesecake).

Essential Ingredients for Red Velvet Strawberry Cheesecake
Creating the perfect Red Velvet Strawberry Cheesecake requires a careful balance of ingredients to achieve the signature flavors and textures. Each layer—red velvet cake, cheesecake, and strawberry topping—has distinct components that work together harmoniously.
1. Red Velvet Cake Layer
The base of this dessert is a classic red velvet cake, known for its soft, slightly tangy, and cocoa-infused flavor. Here’s what you’ll need:
- All-Purpose Flour (2 cups) – Provides structure and stability to the cake.
- Cocoa Powder (2 tablespoons) – Adds a hint of chocolate flavor without overpowering.
- Baking Soda (1 teaspoon) – Helps the cake rise and remain light.
- Salt (½ teaspoon) – Enhances flavor and balances sweetness.
- Granulated Sugar (1 ½ cups) – Sweetens the cake and contributes to its soft texture.
- Unsalted Butter (½ cup, softened) – Adds richness and moisture.
- Eggs (2 large eggs) – Bind ingredients and provide structure.
- Buttermilk (1 cup) – Essential for a tender crumb and slight tanginess.
- White Vinegar (1 teaspoon) – Reacts with the baking soda for a fluffier texture.
- Vanilla Extract (1 teaspoon) – Enhances the overall flavor.
- Red Food Coloring (1 tablespoon or as needed) – Gives the cake its signature vibrant red hue. (Gel food coloring works best for intense color.)
2. Cheesecake Layer
The cheesecake layer is creamy, smooth, and slightly tangy—complementing the red velvet cake perfectly.
- Cream Cheese (16 ounces, softened) – The key ingredient for a rich, creamy texture.
- Granulated Sugar (¾ cup) – Sweetens the cheesecake without making it overly sweet.
- Sour Cream (½ cup) – Adds creaminess and a slight tang.
- Eggs (2 large eggs) – Create structure and help the cheesecake set.
- Vanilla Extract (1 teaspoon) – Enhances the classic cheesecake flavor.
3. Strawberry Topping
A fresh strawberry topping brings brightness and a fruity contrast to the richness of the cake.
- Fresh Strawberries (2 cups, hulled and sliced) – The main ingredient for a natural, sweet topping.
- Granulated Sugar (⅓ cup) – Sweetens the strawberries and helps release their juices.
- Cornstarch (1 tablespoon, mixed with 2 tablespoons water) – Thickens the topping for a glossy finish.
- Lemon Juice (1 tablespoon) – Enhances the fruit’s natural flavor and adds a slight tartness.
4. Optional Add-ons & Variations
- Chocolate Ganache Drizzle – For an extra indulgent touch.
- Whipped Cream – Adds a light and airy texture to balance the density.
- Graham Cracker Crust – Can replace the red velvet base for a traditional cheesecake twist.
Choosing the Right Equipment
To make the perfect Red Velvet Strawberry Cheesecake, having the right equipment is just as important as using quality ingredients. The right tools ensure your cake bakes evenly, your cheesecake sets properly, and your strawberry topping has the right consistency.
1. Baking Equipment for the Cake and Cheesecake
- Springform Pan (9-inch) – A must-have for cheesecakes! The removable sides allow for easy release without damaging the layers. If using a regular cake pan, lining it with parchment paper is essential for easy removal.
- Mixing Bowls (Various Sizes) – Needed for mixing the red velvet batter, cheesecake filling, and strawberry topping separately.
- Electric Mixer (Hand or Stand Mixer) – Helps create a smooth and lump-free cheesecake batter while ensuring the red velvet cake batter is well-mixed.
- Measuring Cups and Spoons – Precision is key in baking, so accurate measuring ensures the right balance of ingredients.
2. Baking and Cooling Essentials
- Oven Thermometer – Many ovens run hotter or colder than their set temperature. An oven thermometer helps ensure your cheesecake bakes at the correct heat.
- Water Bath Setup (Optional) – Prevents cracks in the cheesecake by adding moisture to the oven. This can be done with a roasting pan and hot water.
- Cooling Rack – Helps cool the cake evenly before assembling the layers.
- Offset Spatula or Bench Scraper – Useful for spreading and smoothing the cheesecake layer.
3. For the Strawberry Topping
- Saucepan – Needed to cook the strawberries and thicken the topping.
- Fine Mesh Strainer (Optional) – For straining the strawberry sauce if you prefer a smoother texture.
Step-by-Step Recipe for Red Velvet Strawberry Cheesecake
This Red Velvet Strawberry Cheesecake is made up of three layers: a moist red velvet cake base, a creamy cheesecake center, and a fresh strawberry topping. Follow these step-by-step instructions for a perfect result.
Step 1: Prepare the Red Velvet Cake Layer
- Preheat your oven to 350°F (175°C). Grease a 9-inch springform pan and line the bottom with parchment paper.
- Mix dry ingredients: In a medium bowl, whisk together 2 cups all-purpose flour, 2 tbsp cocoa powder, 1 tsp baking soda, and ½ tsp salt. Set aside.
- Cream butter and sugar: In a large mixing bowl, beat ½ cup unsalted butter and 1 ½ cups sugar until light and fluffy.
- Add eggs: Mix in 2 eggs, one at a time, until fully incorporated.
- Combine wet ingredients: Stir in 1 cup buttermilk, 1 tsp vanilla extract, 1 tsp vinegar, and 1 tbsp red food coloring until smooth.
- Mix everything: Gradually add the dry ingredients to the wet mixture and mix until just combined.
- Bake the cake layer: Pour the batter into the prepared pan and bake for 18-20 minutes or until a toothpick inserted in the center comes out clean. Let it cool completely.
Step 2: Make the Cheesecake Layer
- Lower oven temperature to 325°F (160°C).
- Beat cream cheese: In a large bowl, beat 16 oz softened cream cheese until smooth.
- Add sugar and vanilla: Mix in ¾ cup sugar and 1 tsp vanilla extract.
- Incorporate eggs: Add 2 eggs, one at a time, mixing on low speed to prevent too much air from getting in.
- Mix in sour cream: Stir in ½ cup sour cream for extra creaminess.
- Assemble the cheesecake: Pour the cheesecake batter over the cooled red velvet cake layer.
- Bake with a water bath: Wrap the springform pan in foil and place it in a roasting pan filled with hot water. Bake for 45-50 minutes until the edges are set but the center is slightly jiggly.
- Cool completely: Turn off the oven and let the cheesecake sit inside with the door slightly open for 1 hour. Then refrigerate for at least 4 hours or overnight.
Step 3: Make the Strawberry Topping
- In a saucepan, cook 2 cups fresh strawberries (hulled and sliced), ⅓ cup sugar, and 1 tbsp lemon juice over medium heat until soft.
- Stir in 1 tbsp cornstarch mixed with 2 tbsp water to thicken. Simmer for 2-3 minutes.
- Let it cool before spreading over the chilled cheesecake.
Step 4: Assemble & Serve
- Release the cheesecake from the springform pan.
- Spread the cooled strawberry topping evenly over the cheesecake.
- Garnish with extra strawberries or a drizzle of chocolate.
- Slice with a sharp knife, cleaning it between cuts for neat slices.
Variations & Customizations
Want to put your own spin on this dessert? Here are some fun variations:
1. No-Bake Version
- Skip the red velvet cake and use a graham cracker or Oreo crust instead.
- Make a no-bake cheesecake by mixing cream cheese with whipped cream and refrigerating instead of baking.
2. Mini Cheesecakes
- Instead of a large cake, bake the layers in muffin tins for individual cheesecakes.
- Reduce baking time to 15-18 minutes for the cheesecake layer.
3. Chocolate Lover’s Version
- Add chocolate chips to the cheesecake batter.
- Drizzle the top with a chocolate ganache instead of strawberry topping.
4. Gluten-Free Option
- Use gluten-free flour in the red velvet cake.
- Ensure all other ingredients, including cornstarch, are gluten-free.
5. Keto/Low-Carb Option
- Use almond flour and monk fruit sweetener in the cake.
- Swap sugar for a keto-friendly sweetener in the cheesecake and topping.
Tips & Troubleshooting Common Mistakes
Even expert bakers face challenges! Here’s how to fix common issues:
1. Why did my cheesecake crack?
- Overbaking: Stop baking when the center is slightly jiggly.
- No water bath: Use a water bath to add moisture.
- Cooling too fast: Let the cheesecake cool in the oven with the door slightly open.
2. How do I get a vibrant red velvet color?
- Use gel food coloring for a deep red hue.
- If using liquid food coloring, increase the amount slightly.
3. How do I keep my red velvet cake moist?
- Do not overbake—check with a toothpick early.
- Use buttermilk and vinegar to keep the cake soft.
4. My strawberry topping is too runny!
- Make sure to cook it long enough for the cornstarch to thicken.
- Let it cool completely before spreading on the cheesecake.
5. Best way to store leftovers?
- Keep in an airtight container in the fridge for up to 5 days.
- Freeze individual slices for up to 2 months.
Serving Suggestions & Pairings
This decadent dessert pairs beautifully with different flavors and drinks:
1. Beverage Pairings
- Coffee or Espresso: The bitterness of coffee balances the richness of the cheesecake.
- Black Tea or Chai: A lightly spiced tea complements the tangy cream cheese.
- Red Wine: A sweet dessert wine or a bold Cabernet Sauvignon enhances the cocoa notes.
2. Garnishing Ideas
- Whipped Cream: A light, airy contrast to the dense cheesecake.
- Chocolate Curls: Adds an elegant touch.
- Edible Flowers: A stunning decoration for special occasions.
3. Best Occasions to Serve It
- Valentine’s Day: The red velvet color makes it a romantic treat.
- Birthdays & Anniversaries: A beautiful centerpiece for celebrations.
- Holiday Gatherings: Impress guests with this festive dessert.
Frequently Asked Questions (FAQs)
1. Can I use store-bought red velvet cake instead of making it from scratch?
Yes! You can use a boxed mix or a pre-made red velvet cake to save time. Just make sure it fits your pan.
2. Do I have to use a water bath for the cheesecake?
A water bath helps prevent cracks, but you can bake without it. Just place a pan of hot water on the oven rack below to add moisture.
3. Can I make this cheesecake in advance?
Yes! Refrigerate for up to 2 days before serving. The flavors will blend beautifully.
4. Can I use frozen strawberries for the topping?
Yes, but thaw them first and drain excess liquid before cooking.
5. How do I freeze cheesecake properly?
Wrap slices tightly in plastic wrap and foil and freeze for up to 2 months. Thaw in the fridge before serving.
Print
Red Velvet Strawberry Cheesecake
Description
Red Velvet Strawberry Cheesecake is an indulgent, multi-layered dessert that combines the rich, cocoa-infused flavors of red velvet cake, the creamy, tangy smoothness of classic cheesecake, and a fresh, sweet strawberry topping. This show-stopping treat is perfect for special occasions like Valentine’s Day, birthdays, anniversaries, and holiday gatherings. The balance of flavors—mild chocolate, tangy cream cheese, and fruity strawberry—creates an unforgettable taste experience.
This dessert is baked in a springform pan to create perfect layers. The red velvet cake forms the base, supporting the velvety cheesecake, which is then topped with a glossy strawberry sauce. Garnished with fresh strawberries or a drizzle of chocolate, it’s as beautiful as it is delicious!
Ingredients
For the Red Velvet Cake:
- 1 1/4 cups all-purpose flour
- 1 cup granulated sugar
- 1 tablespoon cocoa powder
- 1/2 teaspoon baking powder
- 1/4 teaspoon baking soda
- 1/4 teaspoon salt
- 1/2 cup vegetable oil
- 1/2 cup buttermilk
- 1 large egg
- 1 teaspoon vanilla extract
- 1 tablespoon red food coloring
- 1/2 teaspoon white vinegar
For the Cheesecake Layer:
- 16 oz cream cheese, softened
- 1/2 cup granulated sugar
- 2 large eggs
- 1 teaspoon vanilla extract
For the Topping:
- 1 cup fresh strawberries, sliced
- 1/2 cup strawberry preserves
- Whipped cream for garnish
Instructions
- Preheat your oven to 350°F (175°C). Grease and line an 8-inch round cake pan.
- In a large bowl, whisk together flour, sugar, cocoa powder, baking powder, baking soda, and salt.
- In another bowl, mix vegetable oil, buttermilk, egg, vanilla extract, red food coloring, and vinegar until smooth.
- Combine the wet ingredients with the dry ingredients and mix until just combined. Pour the batter into the prepared cake pan and bake for 25-30 minutes, or until a toothpick comes out clean. Let it cool completely.
- For the Cheesecake: In a large bowl, beat the softened cream cheese and sugar until smooth. Add the eggs one at a time, beating after each addition. Stir in the vanilla extract.
- Pour the cheesecake mixture into a greased 8-inch springform pan. Bake at 325°F (160°C) for 40-45 minutes, until set. Let it cool, then refrigerate for at least 2 hours.
- Assembly: Once both the cake and cheesecake have cooled, place the red velvet cake on a serving platter. Carefully place the cheesecake layer on top of the red velvet cake.
- In a small saucepan, heat the strawberry preserves until melted. Spread over the top of the cheesecake.
- Arrange the fresh strawberries on top and add a swirl of whipped cream for garnish. Chill for an additional 1-2 hours before serving.
Notes
1. For the Best Red Velvet Cake Layer:
- Use gel food coloring for a vibrant red hue without altering the texture.
- Do not overmix the batter—this keeps the cake soft and moist.
- Bake just until done (check with a toothpick) to prevent a dry cake base.
2. Perfecting the Cheesecake Layer:
- Use room temperature cream cheese for a lump-free, creamy filling.
- Mix at low speed to avoid incorporating too much air, which can cause cracks.
- Bake with a water bath to keep the texture silky and smooth.
3. Strawberry Topping Tips:
- Fresh strawberries work best, but frozen strawberries can be used—just drain excess liquid after thawing.
- Cook until thickened to avoid a runny topping.
- Let the topping cool completely before spreading on the cheesecake.
4. Storage & Make-Ahead Tips:
- Refrigerate for at least 4 hours (or overnight) before serving for the best texture.
- Store leftovers in the fridge for up to 5 days or freeze slices for up to 2 months (wrap tightly in plastic wrap and foil).
5. Presentation & Serving:
- Use a hot knife (wiped clean between cuts) for picture-perfect slices.
- Garnish with whipped cream, chocolate shavings, or extra strawberries for a bakery-style finish.


")