


A Nostalgic Slice of British Baking
There’s something undeniably comforting about a traditional bake. Whether it’s the smell of butter warming in the oven or the familiar tang of dried fruit, classic recipes bring a taste of the past straight to our modern kitchens. And these Old-School Currant Squares? Oh, they hit every nostalgic note perfectly.
I actually first stumbled across a version of this recipe in my grandmother’s old recipe binder—you know, the kind with pages curled at the corners and faded handwriting in blue ink. It instantly reminded me of Sunday afternoons, a hot cup of tea, and little squares of something sweet sitting on a mismatched china plate. These currant squares are simple, yes—but that’s part of their charm. Buttery, slightly crumbly pastry surrounds a rich, syrupy currant center that’s just the right level of sweet. It’s the kind of bake that feels both rustic and refined, and it always disappears quickly in our house!
Let’s walk through it together—this recipe is perfect for anyone looking for something fuss-free but special.
🛒 Ingredients You’ll Need:
For the Pastry:
-
200g cold butter, cubed
-
75g caster sugar (plus a little extra for dusting)
-
300g plain flour
-
Pinch of salt
-
1 large egg
-
1–2 tbsp cold water (if needed to bring the dough together)
For the Filling:
-
200g currants
-
2 tbsp golden syrup
-
1 tsp lemon juice
-
1–2 tbsp water
👩🍳 Let’s Start Baking
Step 1: Prepare Your Tin and Preheat the Oven
Start by preheating your oven to 180°C (fan) or 200°C for conventional. Grease and line a square baking tin—around 20x20cm works perfectly for this recipe. Lining the tin helps with lifting out the squares cleanly later.
Step 2: Make the Pastry
In a large mixing bowl, add your plain flour and a pinch of salt. Drop in the cold, cubed butter and start rubbing it in with your fingertips. You’re aiming for a breadcrumb texture here—think sandy and crumbly, with no big lumps of butter remaining. This step can take a few minutes, but it’s quite therapeutic once you get going.
Next, stir in the caster sugar. Crack in the egg and mix everything together to form a dough. If the mixture seems too dry and crumbly, just add a tablespoon or two of cold water, one at a time, until it comes together into a soft, pliable dough. Be gentle here—overworking the dough can make it tough.
Once you’ve got your dough ready, divide it into two equal portions and wrap one of them in cling film while you roll out the first half.
Step 3: Roll Out the Base
Lightly flour your surface and roll out one portion of dough into a square just big enough to cover the base of your prepared tin. Transfer it to the tin and gently press it into the corners. This layer doesn’t need to be perfect—just make sure it’s even and reaches the edges.
Step 4: Make the Currant Filling
Now it’s time for the good stuff: the currant filling! In a bowl, mix together the currants, golden syrup, lemon juice, and just enough water to loosen it up a little. You don’t want it too wet, just moist enough so the fruit sticks together and spreads easily.
Spoon the currant mixture over the base and spread it out evenly. It should form a thick, fruity layer that’s not too runny but not dry either.
Coming up next in Part 2: Finishing the Layers, Baking to Perfection & Top Tips for Best Results
Let’s keep the old-school vibes going—there’s something incredibly satisfying about watching this classic treat come together.

Finishing the Layers, Baking to Golden Perfection & Pro Tips
(inspired by the tone of The Best Blog Recipes — friendly, easygoing, and approachable)
So now that we’ve got that buttery base and our sweet currant filling snugly nestled in the pan, let’s move on to the final layers of this retro treat. This is where things really start to feel like a proper homemade bake—simple, satisfying, and honestly kind of meditative.
👩🍳 Step 5: Roll Out the Top Layer
Take that second half of your dough (remember the one we wrapped and set aside earlier?) and roll it out on a floured surface to match the size of your tin. This will be your top crust.
Now, I’ll be honest—transferring a rolled pastry layer neatly over the filling can be a little tricky if it’s warm in your kitchen. If your dough is soft or sticky, just pop it in the fridge for 5-10 minutes to firm it up. That little chill makes all the difference!
Once rolled, carefully lay it over the currant mixture. You can lift it using your rolling pin or by folding it gently into quarters and unfolding it over the filling. Don’t worry if it cracks or tears a bit—you can easily patch it up with leftover scraps. Rustic is the name of the game here.
Press the edges down gently to seal the pastry, and if you like, you can lightly crimp around the edge with a fork for a little extra flair.
🔪 Step 6: Score & Sugar the Top
Before baking, take a sharp knife and lightly score the top in a criss-cross pattern. You’re not cutting all the way through—just marking the surface to help with even baking and create a classic, homey look.
Sprinkle a little caster sugar over the top. It’ll melt slightly in the oven and give you that perfect hint of crisp sweetness.
🔥 Step 7: Bake!
Pop the tin in the oven and bake at 180°C (fan) for 25–30 minutes, or until the top is a light golden brown. The pastry should be crisp on top, and the filling should just be starting to bubble underneath.
Pro tip: Keep an eye on it during the last few minutes—if your oven runs hot, the edges might brown quickly. If needed, you can loosely tent it with foil to avoid over-browning.
❄️ Step 8: Cool, Slice, and Serve
Once baked, let the tray cool completely in the tin. This is important because the filling needs time to set. If you try to cut them too soon, you might end up with a gooey mess (tasty, but messy!).
When fully cooled, lift the bake out of the tin using the parchment paper, then slice into squares—about 12 pieces is perfect, but you can cut them smaller if you’re serving them as part of a tea spread.
💡 Bonus Tips & Variations
-
Don’t skip the lemon juice – It balances out the sweetness of the golden syrup and currants beautifully.
-
Swap the currants – If you don’t have currants, you can use raisins or sultanas. Just chop them up slightly so they’re closer in size to currants.
-
Add a hint of spice – A pinch of cinnamon or mixed spice in the filling is delicious, especially in colder months.
-
Make it dairy-free – Use plant-based butter and a dairy-free egg substitute like aquafaba for a dairy-free version. The texture will be slightly different, but still tasty!
These Old-School Currant Squares are the kind of bake that feels like a warm hug from the past—simple, sweet, and made to be shared.
[Next up in Part 3: FAQs, Final Tips, and a Sweet Goodbye]
FAQs + Final Thoughts
🧁 Frequently Asked Questions
1. Can I use raisins instead of currants?
Absolutely! Raisins work just fine—just chop them up a little so they mimic the size of currants for better texture.
2. What’s a good substitute for golden syrup?
You can use light corn syrup or even honey in a pinch, but golden syrup has a uniquely rich flavor that’s hard to beat.
3. Can I make these ahead of time?
Yes! These are perfect for making ahead. They keep well in an airtight container for up to 4-5 days and even freeze well.
4. Can I make this with gluten-free flour?
You can use a 1:1 gluten-free flour blend, but the texture of the pastry might be more crumbly. Adding an extra egg yolk can help bind the dough better.
5. How do I know when it’s done baking?
The top should be golden brown, and you may see tiny bubbles from the filling at the edges. It should feel firm to the touch—not too soft in the center.
6. Why does my pastry keep cracking?
This usually happens if the dough is too dry or warm. Try adding a bit more water when mixing and chill the dough briefly before rolling.
7. How should I store leftover squares?
Once cooled, store them in an airtight container at room temperature. If it’s hot or humid, refrigerate them to keep the pastry crisp.
🥰 Final Thoughts
There’s something so heartwarming about a recipe that’s been around for generations. These Old-School Currant Squares bring back all the cozy vibes of traditional baking without any complicated steps or fancy ingredients. Just good, honest flavors wrapped up in buttery pastry and the sweet tang of currants.
Whether you’re baking for a tea party, a school snack, or just a little something to enjoy with your coffee, these little squares are bound to impress. I hope you’ll give them a try—and if you do, come back and let me know how they turned out! I’d love to hear if you added your own twist.
Until next time, happy baking! 💛
Print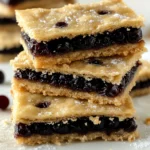
Old-School Currant Squares: A Classic British Bake with Buttery Pastry & Sweet Fruity Filling
- Total Time: 1 hour 35 minutes
Description
Bring back classic British baking with these Old-School Currant Squares. Made with a crisp, buttery pastry and a rich currant filling sweetened with golden syrup, they’re an easy and delicious treat for any time of day. Ideal for afternoon tea or a comforting dessert, these currant bars are simple, nostalgic, and absolutely moreish.
Ingredients
For the Pastry:
-
200g cold butter, cubed
-
75g caster sugar (plus extra for dusting)
-
300g plain flour
-
Pinch of salt
-
1 large egg
-
1–2 tbsp cold water (if needed)
For the Filling:
-
200g currants
-
2 tbsp golden syrup
-
1 tsp lemon juice
-
1–2 tbsp water
Instructions
-
Preheat oven to 180°C (fan) and grease and line a 20x20cm square baking tin.
-
Make the pastry: Rub the cold butter into flour and salt until it resembles breadcrumbs. Stir in sugar. Add egg and mix to form a dough. Add cold water if needed.
-
Divide dough in half. Roll out one half to fit the bottom of the tin and press it in.
-
Make the filling: Mix currants with golden syrup, lemon juice, and a little water until just moistened. Spread over the base layer of pastry.
-
Roll out second half of dough and place over the filling. Press edges to seal and score the top lightly with a knife.
-
Sprinkle with caster sugar.
-
Bake for 25–30 minutes, or until golden and crisp.
-
Cool completely in the tin, then cut into 12 squares.
Notes
-
For a zesty twist, add a bit of orange zest to the filling.
-
Don’t overwork the dough to keep the pastry light and tender.
-
These freeze well—just wrap and store for up to 2 months.
- Prep Time: 20 minutes
- cooling time: 45 minutes
- Cook Time: 30 minutes


")