


Introduction & First Steps
If you grew up in the era of big trays, noisy lunch halls, and the comforting smell of freshly baked puddings wafting from the school kitchen, you’ll know exactly what I mean when I say: old school chocolate cake with chocolate custard. This was the dessert you looked forward to all day. Forget the main course – it was this moist, rich chocolate sponge, cut into neat squares, and drowned in glossy chocolate custard that stole the show every single time.
Even now, it has a special kind of magic. It’s not fancy, it’s not overly decorated, but that’s what makes it perfect. It’s simple, nostalgic, and oh-so comforting. And honestly, recreating it at home is easier than you think. With just a few pantry staples and a bit of mixing, you’ll have a bake that not only fills your kitchen with the most irresistible smell but also brings back memories of scraping your tray clean for every last bit of custard.
So, let’s roll up our sleeves and bring back this school dinner classic right into your kitchen. Here’s everything you’ll need and exactly how to make it.
🌸 Ingredients

For the Cake:
-
1 cup unsalted butter (7 oz), softened
-
1 cup caster sugar (7 oz)
-
4 medium eggs
-
½ cup whole milk (100 ml)
-
⅔ cup cocoa powder (2 oz)
-
1 ⅔ cups self-raising flour (7 oz)
-
¼ teaspoon salt
-
1 teaspoon vanilla extract
For the Chocolate Custard:
-
2 ½ cups whole milk (600 ml)
-
2 tablespoons cocoa powder
-
3 tablespoons caster sugar
-
2 tablespoons cornflour
-
3 ½ oz dark chocolate (100 g), chopped
-
1 teaspoon vanilla extract
Step 1: Prepping the Tin and Oven
Start by preheating your oven to 350°F (325°F fan). Grease and line an 8-inch square tin with parchment paper. This size is perfect for getting those generous, chunky squares – just like the school canteen used to serve.
Step 2: Creaming the Butter and Sugar
In a large bowl, cream together the butter and caster sugar until the mixture is pale, light, and fluffy. This step is key because it traps air into the batter, which helps the sponge rise beautifully in the oven.
Step 3: Adding the Eggs
Crack in the eggs, one at a time, beating well after each addition. Don’t rush this – giving each egg a chance to blend fully into the mixture makes for a smooth, even batter.
Cake Batter, Baking & Chocolate Custard
Step 4: Mixing the Dry Ingredients
In a separate bowl, sift together the cocoa powder, self-raising flour, and salt. Sifting helps remove any lumps and makes sure the cocoa disperses evenly throughout the cake batter.
Step 5: Combining Wet and Dry
Now, fold the dry ingredients into the wet mixture gradually. Alternate between adding spoonfuls of the flour mixture and splashes of milk. Keep folding gently until everything is incorporated. Finally, stir in the vanilla extract. The batter should be smooth, rich, and chocolatey.
Step 6: Baking the Sponge
Pour the mixture into your prepared tin and smooth out the surface with a spatula. Bake for 30–35 minutes, or until the cake has risen, looks springy on top, and a skewer inserted in the center comes out clean.
Once baked, let the sponge cool slightly in the tin before transferring it to a wire rack. The smell at this point will make you want to cut straight in, but trust me, waiting a few minutes makes it easier to slice into those classic squares later.
Making the Chocolate Custard
This custard is the real star of the show – thick, glossy, and intensely chocolatey.
-
In a saucepan, mix together the cocoa powder, cornflour, sugar, and a splash of milk to make a smooth paste.
-
Slowly whisk in the rest of the milk until everything is combined.
-
Place the pan over medium heat and cook gently, stirring continuously until the custard thickens.
-
Once thick, take the pan off the heat, stir in the chopped dark chocolate, and let it melt fully. Finish with a drop of vanilla extract for that extra warmth.
What you’ll end up with is a custard that’s rich, velvety, and perfect for pouring.
Tips for the Best Nostalgic Chocolate Pud
-
Slightly underbake the cake if you love that gooey, soft texture from school days.
-
Make the custard ahead of time if you’re entertaining. Just reheat it gently with a splash of milk to loosen it up.
-
Prefer a sweeter custard? Swap dark chocolate for milk chocolate.
-
The sponge keeps in an airtight container for up to 3 days – though it rarely lasts that long!
FAQs & Conclusion
Frequently Asked Questions
1. Can I make this cake in advance?
Yes! The sponge can be baked a day ahead and stored in an airtight container. Just reheat slices gently before serving with custard.
2. What if I don’t have self-raising flour?
No problem. Just use plain flour and add 2 teaspoons of baking powder.
3. Can I freeze the sponge?
Absolutely. Wrap cooled sponge squares tightly in clingfilm and freeze for up to 2 months. Defrost and warm slightly before serving.
4. Can I use skimmed or semi-skimmed milk for the custard?
Whole milk gives the richest, creamiest custard, but semi-skimmed works too. Skimmed will make it thinner, so you may need a touch more cornflour.
5. Is this recipe kid-friendly?
Yes! Kids will love it – just consider using milk chocolate in the custard if you want a sweeter, less intense flavor.
6. How do I know when the sponge is perfectly baked?
It should be risen, slightly pulling away from the edges, and a skewer poked in the middle should come out clean (or with just a few crumbs if you like it gooey).
7. Can I serve it cold?
You can, but this pudding is best warm with hot custard. That’s what gives it its nostalgic charm.
Wrapping It Up
There’s something so comforting about this old school chocolate cake with chocolate custard. It’s simple, nostalgic, and brings a smile with every bite. Whether you grew up with this pudding in the school canteen or are discovering it for the first time, it’s a recipe that never fails to warm hearts (and bellies).
Serve it warm, cut into chunky squares, and pour over plenty of glossy custard. Then sit back, close your eyes, and let the memories flood in.
If you give this recipe a try, I’d love to hear how it turned out for you! Did you stick with the dark chocolate custard, or go for the sweeter milk chocolate twist? Either way, I can promise one thing: there won’t be many leftovers.
Print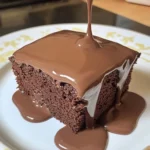
Old School Chocolate Cake with Chocolate Custard – Classic School Dinner Dessert Recipe
- Total Time: 55 minutes
Description
Step back into the school canteen with this old school chocolate cake with chocolate custard – a true retro dessert classic. Moist, chocolatey sponge squares paired with rich, velvety custard make the ultimate comfort food. Whether you’re recreating childhood memories or introducing it to a new generation, this pudding is simple to make and guaranteed to please. Perfect for family dinners, weekend treats, or just when you’re craving something nostalgic.
Ingredients
For the Cake:
-
1 cup unsalted butter (7 oz), softened
-
1 cup caster sugar (7 oz)
-
4 medium eggs
-
½ cup whole milk (100 ml)
-
⅔ cup cocoa powder (2 oz)
-
1 ⅔ cups self-raising flour (7 oz)
-
¼ teaspoon salt
-
1 teaspoon vanilla extract
For the Chocolate Custard:
-
2 ½ cups whole milk (600 ml)
-
2 tablespoons cocoa powder
-
3 tablespoons caster sugar
-
2 tablespoons cornflour
-
3 ½ oz dark chocolate (100 g), chopped
-
1 teaspoon vanilla extract
Instructions
-
Prep the oven and tin – Preheat oven to 350°F (325°F fan). Grease and line an 8-inch square tin.
-
Cream butter and sugar – Beat together butter and sugar until pale and fluffy.
-
Add eggs – Mix in eggs one at a time, beating well after each.
-
Mix dry ingredients – In a separate bowl, sift flour, cocoa powder, and salt.
-
Combine – Fold dry ingredients into wet mixture gradually, alternating with splashes of milk. Stir in vanilla until smooth.
-
Bake – Pour into tin, smooth the top, and bake for 30–35 minutes. Sponge should spring back and skewer come out clean. Cool slightly before turning out.
-
Make the custard – In a saucepan, mix cocoa, cornflour, sugar, and a little milk to form a paste.
-
Add milk & cook – Slowly whisk in remaining milk. Cook over medium heat, stirring until thickened.
-
Finish – Remove from heat, stir in chopped chocolate until melted, and add vanilla.
-
Serve – Cut cake into generous squares and serve warm with plenty of custard.
Notes
-
For a gooey nostalgic texture, take the sponge out a couple of minutes early.
-
Custard can be made ahead – reheat gently with a splash of milk to loosen.
-
Swap dark chocolate for milk chocolate in the custard if you prefer a sweeter taste.
-
The sponge keeps for 3 days in an airtight container, or can be frozen for up to 2 months.
- Prep Time: 20 minutes
- Cook Time: 35 minutes


")