


A Slice of Tradition – Baking the Beloved Lincolnshire Whitsun Cake
There’s something undeniably comforting about old English bakes—those recipes that have stood the test of time and still bring warmth to our kitchens today. And if you’ve never heard of Lincolnshire Whitsun Cake, you’re in for a delightful surprise. Imagine a rustic, golden-brown yeasted cake, rich with sweet spiced currants and buttery brown sugar layers—somewhere between a sweet bread and an Eccles cake, but with a charm all its own.
I first came across this recipe during a deep dive into traditional British baking (because yes, I absolutely nerd out over heritage recipes!), and I was instantly intrigued. The idea of letting a fruit-studded cake rest to develop its flavor reminded me of how some things just get better with time—like soup the next day, or those leftover Thanksgiving sandwiches. So naturally, I had to try it, and oh my goodness—what a cozy, fragrant masterpiece it turned out to be.
This cake is traditionally made around Whitsuntide (a spring holiday following Easter), using the preserved fruits from the previous year’s harvest. It was a celebratory treat, meant to be wrapped and shared—though fair warning, you may not want to share once you’ve had a bite.
Let’s jump into how to make this beautiful, festive bake. It’s easier than you’d think, and the results are absolutely worth every minute.
Ingredients You’ll Need
Here’s what you’ll want to gather before getting started:
-
12 tbsp unsalted butter (170g), divided
-
1/8 tsp fine salt
-
2½ cups + 2 tbsp strong plain flour (315g)
-
1 sachet fast-action yeast (about 2¼ tsp)
-
½ cup minus 1 tbsp whole milk (110ml)
-
3 tbsp double cream (40ml)
-
1½ cups dried currants (225g)
-
1 cup packed soft light brown sugar (225g)
-
2 tbsp butter (for filling, 30g)
-
1 small egg yolk
-
1 tsp ground nutmeg
-
½ tsp ground allspice
-
1 egg white, for glazing
-
1–2 tbsp caster sugar, for finishing
Step-by-Step: Let’s Make It!
Step 1: Prep Your Tin and Oven
Grease and line a 20cm loose-bottomed cake tin. This helps control the rise and keeps things neat and tall. Preheat your oven to 350°F (180°C) or 320°F (160°C fan).
Step 2: Make the Dough Base
Start by rubbing 6 tablespoons (85g) of the butter into the flour and salt with your fingers until it looks like breadcrumbs. You’ll want it to be light and crumbly—not clumpy. Then, stir in your yeast.
Meanwhile, gently melt the remaining 6 tablespoons (85g) of butter with the milk and cream in a small saucepan. Let it cool slightly until it’s just warm to the touch—what some people call “blood temperature.” This is the sweet spot for yeast.
Pour the warm milk mixture into the flour mixture and stir to form a very soft dough. It might seem sticky at first, but don’t worry—that’s what we want. Turn it out onto a floured surface and knead for 10 minutes until it becomes smooth and elastic.
Cover the dough with a damp cloth and let it rise somewhere cozy (like inside a turned-off oven with the light on) for 30 minutes. It won’t double in size yet, but it should puff up a bit.
Step 3: Prepare the Spiced Fruit Filling
While the dough rests, grab a small saucepan and combine your currants, brown sugar, 2 tablespoons butter, egg yolk, nutmeg, and allspice. Warm gently until the fruit is glossy and the sugar melts into a rich, fragrant mixture. Don’t let it boil—just a soft heat to infuse the flavors. Set it aside to cool slightly.
Step 4: Shape and Layer the Cake
Once your dough has puffed, punch it down gently (this is called “knocking back”) and divide it into four equal parts. Do the same with the filling, dividing it into three portions.
Roll or pat each dough portion into a neat 20cm circle—just about the size of your tin. No need to stress over perfection here, just aim for a nice, even layer.
Step 5: Assemble the Layers
Place one dough circle at the bottom of the prepared tin. Spread one-third of the fruit filling over it, keeping a 1cm border around the edge (this helps prevent overflow during baking). Repeat the process: dough, fruit, dough, fruit—and finish with your final dough layer on top.
Cover the tin loosely and let it rise again for about 30 minutes, until it’s puffed and just starting to reach the top of the tin.
Coming up in Part 2: The final bake, glazing magic, and expert tips to make your Whitsun Cake absolutely unforgettable.
Step 6: Time to Bake
Once your cake has risen slightly in the tin (this should take about 30 minutes), place it in your preheated oven and bake for 30 minutes. You’ll notice the dough begin to rise even more, and the kitchen will start smelling like warm spices and sweet bread—it’s one of those “is this real life?” moments.
But we’re not done yet!
Step 7: Glaze and Sugar
After the initial 30 minutes of baking, take the cake out carefully (leave the oven on). Quickly brush the top with beaten egg white—this helps create a slight shine—and then scatter 1 to 2 tablespoons of caster sugar over the top. The sugar melts just a bit and gives it a beautiful sweet crust.
Now pop the cake back into the oven for another 25 to 30 minutes, until the top is a rich brown and the sides are just starting to pull away from the tin. If you’re unsure whether it’s done, give it a light tap on the top—it should sound hollow, like a good loaf of bread.
Step 8: Cool and Rest (If You Can Wait!)
Let the cake cool in the tin for about 10 minutes, then carefully lift it out and place it on a wire rack. At this point, the aroma is going to be ridiculously tempting.
You can absolutely slice into it while it’s still warm (in fact, it’s lovely served that way with a cup of tea or even a bit of butter melted over the slice). But—and this is a traditional tip worth trying—this cake actually improves if you wrap it up once it’s fully cooled and let it rest for a day. Something about the way the spiced fruit seeps into the dough makes the flavor even deeper and more satisfying. It’s one of those old-fashioned baking secrets that modern bakes just don’t always take the time for.
Helpful Tips & Variations
Because this is a heritage recipe, there’s room to play while still staying true to its roots. Here are a few handy tips I’ve learned along the way:
➤ Want it Less Sweet?
If you’re someone who prefers a more fruit-forward cake (rather than sugar-forward), you can absolutely reduce the brown sugar to ¾ cup and increase the currants to 2 full cups. This version leans more toward a fruited bread—still sweet, but less sugary.
➤ Don’t Have Currants?
If you can’t find currants, you can substitute with sultanas or raisins, though currants do give that lovely little tart pop that makes the cake special. You could even do a mix!
➤ Spice It Your Way
The combo of nutmeg and allspice is traditional, but you could experiment with a pinch of cinnamon or clove if you like a deeper spice profile.
➤ Storing for Best Flavor
Wrap your cooled cake tightly in baking parchment or plastic wrap and let it sit at room temperature for 1–2 days. The texture softens, the flavors blend, and it becomes even more delicious. It keeps well for 2 to 3 days, which makes it great for baking ahead of time for guests or gatherings.
➤ Serving Ideas
While this is perfect on its own, try it with:
-
A pat of butter on a warm slice
-
A drizzle of double cream
-
A dollop of clotted cream or mascarpone for extra indulgence
It even toasts beautifully after a couple days—like a spiced fruit bread with that golden edge. Just saying!
Okay, so by now your kitchen smells amazing, your cake is cooling (or already half-eaten—no judgment), and you’re probably wondering how to make this part of your regular baking rotation.
Before we wrap up, let’s tackle a few frequently asked questions. Whether this is your first time making a yeasted cake or you’re just curious about the tradition, I’ve got you covered.
🔍 FAQ: Lincolnshire Whitsun Cake
1. What exactly is a Whitsun Cake? Is it a bread or a cake?
Great question! It’s kind of both. Think of it as a sweet yeasted bread layered with fruit and sugar—like a cross between a currant loaf and an Eccles cake. It’s rustic, spiced, and sliceable like bread but sweet and rich like cake.
2. Can I make it ahead of time?
Absolutely, and it’s even encouraged! One of the best things about this recipe is that it improves after resting. Wrap the cooled cake tightly in baking paper or cling film and let it sit for 24–48 hours at room temperature. The flavors blend beautifully, and the texture becomes even more tender.
3. What’s the best way to store leftovers?
Keep any leftovers tightly wrapped and stored at room temperature. It stays fresh for 2–3 days, and you can always warm up individual slices in the microwave or toaster for that fresh-baked feel.
4. Can I freeze the cake?
Yes, you can! Once the cake is completely cool, wrap it well in plastic wrap and then foil (or place it in a freezer-safe bag). It will keep in the freezer for up to 2 months. Let it thaw at room temperature before serving, and give it a quick warm-up in the oven if you like.
5. I’m not a fan of currants. Can I use different fruit?
Definitely. While currants are traditional, you can use sultanas, raisins, chopped dates, or even a mix of dried fruits. Just make sure to stick to the same overall quantity (about 1½ to 2 cups) so the texture stays balanced.
6. Why do we use egg white for glazing instead of a whole egg?
The egg white creates a shiny finish without adding too much color. It also helps the caster sugar topping stick and gives that beautiful crisp top. Using a whole egg would brown it more, which could interfere with the soft golden finish.
7. Can I make this in a different shaped pan?
A 20cm round tin with high sides is ideal because it helps the dough rise neatly. If you only have a square tin or a springform pan, you can still make it—just keep an eye on the baking time and make sure the dough layers stay flat and even.
✨ Final Thoughts: A Bake Worth Celebrating
There’s a reason this cake has been around for generations. It’s the kind of bake that brings a bit of ceremony to the kitchen—layering the dough, simmering the fruit, brushing on the glaze. It’s simple, but in the best, most rewarding way.
I personally love how versatile it is. You can serve it warm with butter, slice it and toast it the next day, or wrap it up for a road trip snack (yes, I’ve done this). It’s a bake that gets better the more you make it—and once you’ve made it once, I guarantee it’ll make its way into your regular baking rotation.
If you do give this Lincolnshire Whitsun Cake a try, I’d love to hear how it turned out for you! Did you add your own twist? Try a new fruit? Let it rest overnight? Drop a comment below and share your baking story—I always love reading them, and your tips might just help another reader too!
Until next time—happy baking, and enjoy every slice of this beautifully spiced, buttery delight.
Print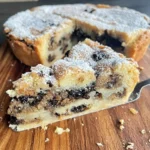
Traditional Lincolnshire Whitsun Cake – A Spiced Yeasted Treat for Festive Gatherings
- Total Time: 2 hours 15 minutes
Description
This traditional Lincolnshire Whitsun Cake is a spiced, yeasted British bake layered with sweet currants and soft brown sugar. A cross between a sweet bread and an Eccles cake, it’s packed with warm spice and fruit, baked until golden, and finished with a crisp sugary glaze. Perfect for Whitsuntide or any time you’re craving a nostalgic, cozy treat, this festive cake improves in flavor after resting for a day. Enjoy warm or wrap and store for an even deeper flavor.
Ingredients
For the Dough:
-
12 tbsp (170g) unsalted butter, divided
-
1/8 tsp fine salt
-
2½ cups + 2 tbsp (315g) strong plain flour
-
1 sachet (2¼ tsp) fast-action yeast
-
½ cup minus 1 tbsp (110ml) whole milk
-
3 tbsp (40ml) double cream
For the Filling:
-
1½ cups (225g) dried currants
-
1 cup (225g, packed) soft light brown sugar
-
2 tbsp (30g) unsalted butter
-
1 small egg yolk
-
1 tsp ground nutmeg
-
½ tsp ground allspice
For the Glaze:
-
1 egg white, beaten
-
1–2 tbsp caster sugar, for sprinkling
Instructions
-
Preheat & Prepare Pan:
Grease and line a 20cm (8-inch) loose-bottom cake tin. Preheat the oven to 350°F (180°C) or 320°F (160°C fan). -
Make the Dough:
Rub 6 tbsp (85g) butter into the flour and salt until it resembles fine breadcrumbs. Stir in the yeast. -
Warm Wet Ingredients:
Melt the remaining 6 tbsp (85g) butter with milk and cream. Let cool to blood temperature. Stir into the flour mixture to form a soft dough. -
Knead & Rest:
Knead the dough on a floured surface for about 10 minutes, until smooth and elastic. Cover and rest in a warm place for 30 minutes. -
Make the Filling:
In a saucepan, gently warm the currants, brown sugar, 2 tbsp butter, egg yolk, nutmeg, and allspice until glossy and fragrant. Cool slightly. -
Shape Dough & Assemble:
Knock back the dough and divide into 4 equal pieces. Roll each into a 20cm round. Divide the filling into 3 equal portions. -
Layer the Cake:
Place one dough round in the bottom of the tin. Spread one-third of the fruit filling over it, leaving a 1cm border. Repeat with two more layers of dough and fruit. Finish with the last dough round on top. -
Second Rise:
Cover loosely and allow the cake to prove for 30 minutes until lightly puffed. -
Bake – First Stage:
Bake in the preheated oven for 30 minutes. -
Glaze & Finish Baking:
Remove the cake, brush the top with beaten egg white, sprinkle with caster sugar, and return to the oven for 25–30 more minutes. It should be well browned and pulling away from the tin sides. -
Cool & Serve:
Cool in the tin for 10 minutes, then lift out and cool completely on a wire rack. Serve warm or wrap tightly once cooled and rest 24 hours for best flavor.
Notes
-
Make Ahead: The cake develops deeper flavor if wrapped and rested for 24–48 hours.
-
Fruit Alternatives: Raisins or sultanas can be used in place of currants.
-
Less Sweet Option: Use ¾ cup brown sugar and 2 cups of currants for a fruitier, less sugary finish.
-
Storage: Store in an airtight wrap at room temp for up to 3 days or freeze for up to 2 months.
-
To Serve: Delicious warm with butter, or toasted after a couple days.
- Prep Time: 30 minutes
- Proving Time: 1 hour
- Cook Time: 55–60 minutes


")