

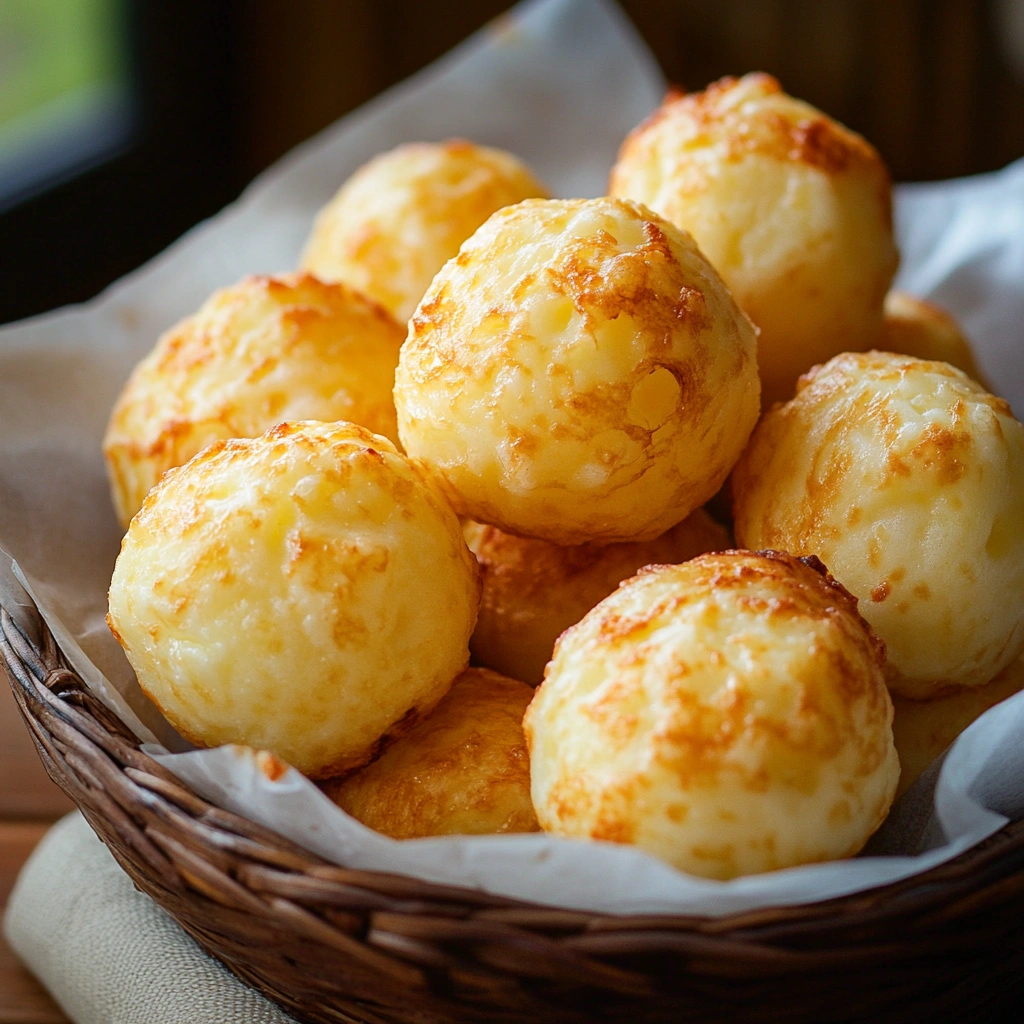
Crispy on the outside, soft and chewy on the inside, Pão de Queijo—or Brazilian cheese bread—is one of Brazil’s most beloved snacks. Made primarily from tapioca flour and cheese, this naturally gluten-free treat is as easy to love as it is to make. Whether you’re grabbing a warm one from a local bakery in São Paulo or baking them fresh at home, Pão de Queijo offers a comforting bite of Brazilian culinary tradition.
Pronounced pown-deh-kay-zho, this cheesy bread is a staple in Brazilian homes, especially at breakfast or during afternoon coffee breaks, known as café da tarde. Its irresistible texture and rich cheese flavor make it a hit with both locals and visitors. Thanks to its simplicity and minimal ingredients, Pão de Queijo has also found its way into kitchens around the world.
What sets it apart from other bread recipes is its use of tapioca flour, also known as cassava or manioc starch. This ingredient gives Pão de Queijo its distinct chewy texture and makes it a perfect choice for those following a gluten-free diet. The dough is often made with a mix of cheeses—typically Parmesan, Minas cheese, or mozzarella—blended with eggs, milk, and oil to form a light batter.
One of the reasons for its growing popularity is how easy it is to prepare. With just a blender and a muffin tin, you can whip up a batch in under 30 minutes, making it a go-to recipe for busy mornings or impromptu gatherings. Whether enjoyed on its own, paired with coffee, or served as a side dish, Pão de Queijo is a little bite of Brazil that brings warmth, flavor, and tradition to any table.
A Quick History of Pão de Queijo
The origins of Pão de Queijo trace back to the 18th century in the state of Minas Gerais, Brazil—a region known for its rolling hills, dairy farms, and rich food culture. Long before cheese was added, indigenous communities in the area used cassava (also known as manioc), a native root vegetable, to make simple starch-based bread. Cassava was a dietary staple, and its starch served as the foundation for many early recipes.
When Portuguese colonists arrived, they brought dairy traditions with them, and over time, local cooks began incorporating cheese into their traditional cassava bread. The result was a new kind of pão (bread), enriched with local cheese and beloved for its chewy, savory goodness. By the 20th century, Pão de Queijo had become a popular household snack and breakfast item across Brazil.
Traditionally, it was made using “Queijo Minas”, a mild white cheese native to the region, but modern variations now include Parmesan, mozzarella, or a mix of different cheeses. Despite its humble beginnings, Pão de Queijo has evolved into a cherished symbol of Brazilian hospitality and culinary identity. Today, it’s enjoyed around the world but remains a nostalgic comfort food for many Brazilians.
Ingredients Breakdown
One of the reasons Pão de Queijo is so beloved—beyond its delicious flavor—is its simplicity. The classic recipe uses just a handful of ingredients, most of which are pantry staples or easy to find at grocery stores or Latin markets. Here’s a closer look at what goes into making this cheesy, chewy Brazilian favorite.
1. Tapioca Flour (Cassava Starch)
The defining ingredient in Pão de Queijo is tapioca flour, also known as cassava flour or polvilho in Portuguese. It comes in two forms in Brazil: polvilho doce (sweet starch) and polvilho azedo (sour starch). Most international versions use sweet tapioca flour, which gives the bread a light, chewy texture. Tapioca flour is naturally gluten-free, making this recipe ideal for those with gluten sensitivities.
2. Cheese
Traditionally, Pão de Queijo is made with Queijo Minas, a mild, semi-soft cheese native to the Minas Gerais region. Outside Brazil, a mix of Parmesan, mozzarella, or feta can be used depending on your taste preference. Parmesan adds sharpness, while mozzarella brings a gooey, stretchy texture. The cheese is what gives the bread its signature flavor and golden crust.
3. Eggs
Eggs act as a binding agent and help create the fluffy, puffed-up interior. They also contribute richness to the dough.
4. Milk
Warm milk is used to hydrate the tapioca flour and blend the mixture smoothly. Whole milk is preferred for a richer texture, but plant-based milks can be used in dairy-free adaptations.
5. Oil
Neutral oils like vegetable oil, canola, or light olive oil are used to add moisture and fat, contributing to the crisp outer layer.
Traditional vs. Easy Version (200 words)
There are two main ways to make Pão de Queijo: the traditional stovetop method and the modern easy blender version. Both result in delicious, cheesy rolls, but they differ in technique and texture.
The traditional method involves heating milk and oil on the stove, then mixing it with tapioca flour before kneading in the eggs and cheese. This approach yields a slightly denser texture with more depth of flavor and is considered the authentic Brazilian technique. However, it can be time-consuming and a bit tricky for beginners due to the hot dough and hand mixing involved.
On the other hand, the easy version uses a blender or food processor to combine all the ingredients into a smooth batter. This method skips the stovetop and kneading entirely, making it incredibly convenient and beginner-friendly. The result is lighter and fluffier Pão de Queijo, with a more uniform shape when baked in a muffin tin or mini muffin pan.
While purists may prefer the traditional method, the easy version is perfect for those short on time or new to Brazilian cooking. Best of all, both methods retain the essential cheesy, chewy goodness that makes Pão de Queijo so irresistible.
Easy Brazilian Cheese Bread Recipe (Step-by-Step)
Here’s a foolproof, no-knead recipe using a blender to make Pão de Queijo at home in under 30 minutes.
Ingredients:
-
1 cup whole milk (warm)
-
1/2 cup neutral oil (vegetable or canola)
-
2 large eggs
-
1 1/2 cups tapioca flour
-
1 teaspoon salt
-
1 to 1 1/2 cups grated cheese (Parmesan, mozzarella, or a mix)
-
Optional: 1/2 teaspoon garlic powder or dried herbs
Instructions:
Step 1: Preheat the Oven
Preheat your oven to 375°F (190°C). Lightly grease a mini muffin pan or line it with silicone cups.
Step 2: Blend the Batter
In a blender or food processor, combine the milk, oil, and eggs. Blend for 10–15 seconds until smooth.
Add tapioca flour and salt, and blend again until well incorporated.
Lastly, add the grated cheese and pulse a few times just to mix—don’t over-blend.
Step 3: Pour into Muffin Tin
Pour the batter into each muffin cup, filling about 3/4 full. The batter will be thin—this is normal.
Step 4: Bake
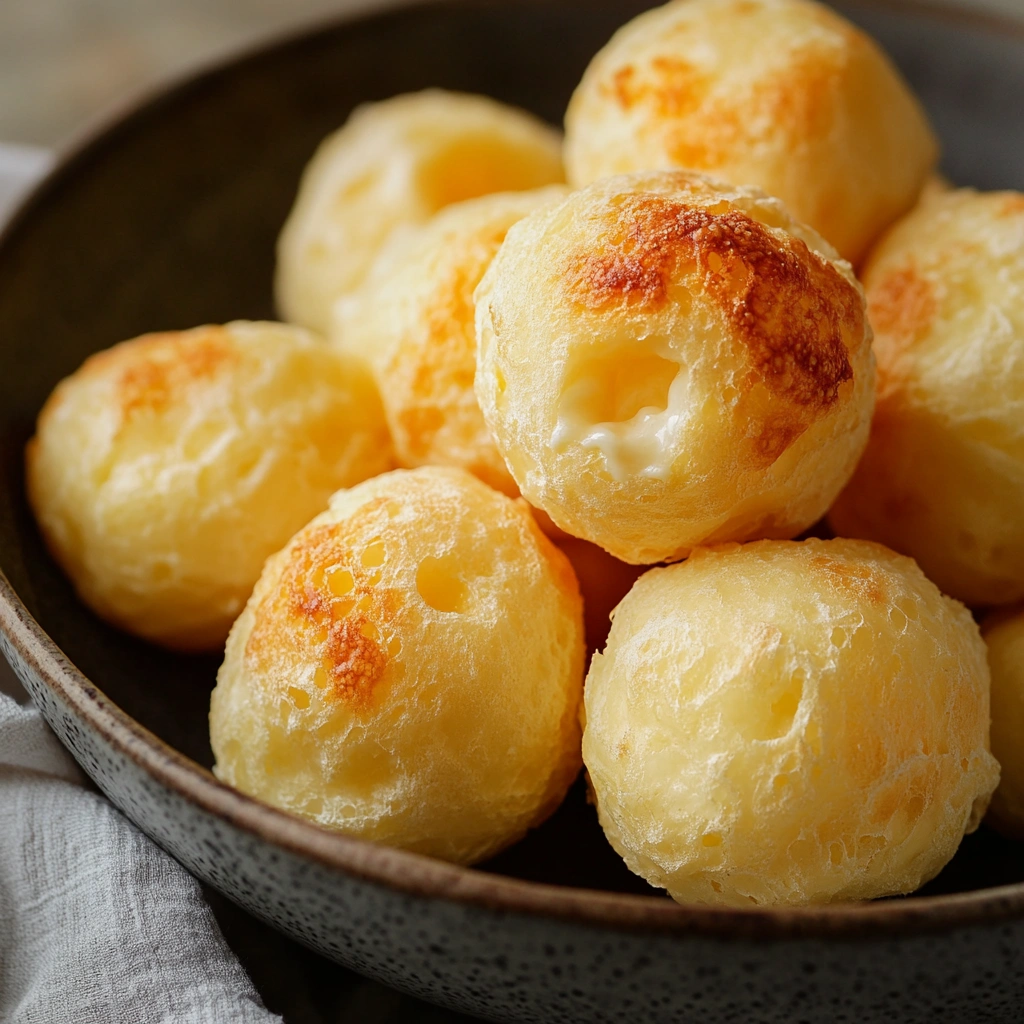
Bake for 15–20 minutes, or until the tops are puffed and lightly golden.
The exterior should be crisp, and the inside should be chewy and airy.
Step 5: Serve Warm
Remove from oven and let cool for a few minutes. Serve warm for the best texture and flavor. They’ll deflate slightly as they cool—totally normal!
Tips:
-
For crispier bites, bake a few extra minutes.
-
Use a mix of sharp and mild cheeses for a balanced flavor.
-
These are best eaten fresh but can be frozen and reheated easily.

Variations of Pão de Queijo
While the classic Pão de Queijo is a treat on its own, there are many creative ways to adapt and personalize this Brazilian cheese bread. From different cheeses to unique fillings, these variations let you customize the recipe based on dietary needs, regional preferences, or simply what you have in your kitchen.
1. Cheese Variations
Traditionally, Queijo Minas is used, but outside Brazil, Parmesan, mozzarella, feta, or cheddar are popular options. Mixing sharp and mild cheeses can create a rich, complex flavor. Cream cheese can also be added for a softer texture.
2. Stuffed Pão de Queijo
Some variations involve stuffing the dough with extra cheese, ham, cream cheese, or even guava paste (goiabada) for a sweet-and-savory twist. These are often served as party appetizers or snacks.
3. Herbed or Spiced Versions
Add herbs like rosemary, oregano, or parsley to the batter for extra aroma. Spices like paprika, cumin, or chili flakes can give your rolls a flavorful kick.
4. Vegan and Dairy-Free Options
Replace cheese with nutritional yeast and plant-based cheeses, and use almond milk or oat milk with a touch of olive oil. While texture may differ slightly, it still satisfies the craving for cheesy bread.
5. Mini or Jumbo Sizes
Make bite-sized versions for snacks or appetizers, or bake jumbo ones for sandwich-style servings.
Nutritional Info & Dietary Considerations
Pão de Queijo is not just delicious—it’s also naturally gluten-free, making it a favorite among those with gluten intolerance or celiac disease. Thanks to tapioca flour, it avoids wheat altogether while still offering a satisfying, chewy bread texture.
Nutritional Snapshot (per mini roll):
-
Calories: ~70–100
-
Protein: 2–4g
-
Fat: 4–6g
-
Carbs: 6–10g
-
Fiber: 0–1g
(Nutritional values vary based on cheese type and portion size.)
Dietary Highlights:
-
Gluten-Free: Tapioca flour is 100% gluten-free and grain-free, making this bread ideal for people avoiding wheat.
-
Low Sugar: There’s no added sugar in the classic recipe.
-
Protein-Rich: Thanks to the eggs and cheese, Pão de Queijo offers a modest protein boost.
-
Low in Fiber: While delicious, it lacks fiber, so pair it with fruits, vegetables, or fiber-rich foods for a balanced snack.
For Special Diets:
-
Keto or Low-Carb: With some cheese and flour adjustments, it can be adapted to fit a low-carb lifestyle.
-
Dairy-Free: Use plant-based cheese and non-dairy milk; note that the texture and flavor will change slightly.
-
Nut-Free: This recipe is naturally nut-free, as long as no almond-based milk or cheese is used.
How to Serve Pão de Queijo
Pão de Queijo is incredibly versatile and can be served in a variety of ways depending on the time of day, occasion, or preference. Its warm, cheesy flavor and soft interior make it suitable for breakfast, snacks, or even as an appetizer at dinner parties.
1. Traditional Serving
In Brazil, Pão de Queijo is commonly enjoyed for breakfast or during café da tarde (afternoon coffee). It’s often paired with a hot cup of Brazilian coffee, tea, or a creamy hot chocolate.
2. As a Snack
These cheesy rolls are the perfect on-the-go snack. Their small, portable size makes them easy to pack for school lunches, office snacks, or road trips.
3. Party Appetizer or Side Dish
Serve them warm in a basket at brunches, dinner parties, or barbecues. You can even pair them with dips like garlic butter, spicy cheese sauce, or chimichurri for extra flavor.
4. Stuffed and Sandwich-Style
Larger rolls can be sliced and filled with ham, cheese, or even eggs for a delicious mini sandwich.
5. Sweet Pairings
Surprisingly, Pão de Queijo also pairs well with sweet toppings like guava jam, dulce de leche, or honey—perfect for those who love sweet and savory combos.
Storing & Reheating Tips
To enjoy Pão de Queijo at its best, it’s important to store and reheat it properly. While it’s most delicious when fresh out of the oven, leftovers can be kept and enjoyed later with the right techniques.
Storing:
-
Room Temperature: Store cooled cheese breads in an airtight container for up to 2 days.
-
Refrigerator: They can be stored in the fridge for up to 5 days, but they may lose some of their softness.
-
Freezer: For longer storage, freeze baked or unbaked rolls in a zip-top bag for up to 3 months.
Reheating:
-
Oven: Reheat at 350°F (175°C) for 5–7 minutes to restore crispness.
-
Air Fryer: Perfect for a quick 3–5 minute warm-up.
-
Microwave: Use for a softer texture—heat for 15–20 seconds—but be aware the outside may not crisp up.
Avoid over-reheating, as it can make the rolls dry. For best results, reheat only the amount you plan to eat.
Pão de Queijo Around the World
While Pão de Queijo has its roots in Minas Gerais, Brazil, its popularity has spread far beyond its homeland. Today, this beloved cheese bread can be found in bakeries, supermarkets, and restaurants across the globe.
In the U.S. and Europe:
Many health-conscious eaters have embraced Pão de Queijo as a naturally gluten-free bread alternative. It’s often featured in upscale brunch spots, international cafés, and even frozen in specialty grocery stores. Some Latin and Brazilian supermarkets stock frozen versions for easy baking at home.
In Japan and Asia:
Japanese bakeries have introduced their own take on Pão de Queijo, often using mochi flour or sweet fillings, blending local preferences with Brazilian tradition.
In Global Fusion Cuisine:
Chefs and home cooks around the world are adapting the recipe with regional cheeses, spices, or fillings—from French Comté to spicy Mexican cheddar blends.
Cultural Symbol:
Beyond food, Pão de Queijo is now a culinary ambassador of Brazilian culture, showcasing the diversity and richness of Brazil’s food traditions to international audiences.
Make-Ahead & Freezer-Friendly Tips
One of the best things about Pão de Queijo is how well it fits into a busy lifestyle. You can prepare it in advance, freeze it, and bake fresh whenever you crave that warm, cheesy bite.
Make-Ahead Batter:
-
Mix the batter in a blender and refrigerate it in an airtight container for up to 2 days.
-
Stir well before using, as the ingredients may separate slightly.
Freezing Options:
Option 1: Freeze the Batter
-
Pour the batter into mini muffin pans and freeze until solid.
-
Transfer frozen batter pucks into a zip-top bag.
-
Bake directly from frozen, adding 3–5 minutes to the usual baking time.
Option 2: Freeze After Baking
-
Bake as normal, let cool completely, then freeze.
-
Reheat from frozen in the oven at 350°F (175°C) for 7–10 minutes.
Tips for Success:
-
Label the bags with date and baking instructions.
-
Avoid overfilling the muffin cups if freezing batter—they’ll expand as they bake.
-
For ultimate freshness, freeze within 24 hours of making the batter or baking.
Tips for Hosting with Pão de Queijo
Pão de Queijo makes an excellent addition to any gathering, from casual brunches to elegant dinner parties. Its bite-sized nature, comforting flavor, and universal appeal make it a guaranteed crowd-pleaser.
1. Serve Fresh and Warm
Bake them just before guests arrive so they can enjoy the irresistible aroma and warmth. Consider serving them in a lined bread basket or on a wooden platter for a rustic look.
2. Create a Dipping Station
Offer a few dips on the side—like herbed butter, garlic aioli, tomato chutney, or spicy cheese sauce—to let guests customize their bites.
3. Mini Versions for Parties
Use a mini muffin pan to make small, poppable rolls that are easy to grab and eat while mingling. They also reheat quickly and stay fresher longer.
4. Pair with Drinks
Pair Pão de Queijo with wine, caipirinhas, or sparkling water with lime for a fun Brazilian twist. For brunch, coffee or iced tea makes a great match.
5. Label for Dietary Needs
Since they’re gluten-free, you can proudly label them for guests with food sensitivities. Also consider making a dairy-free batch if needed.
FAQs
1. What is Brazilian cheese bread made of?
Pão de Queijo is made from tapioca flour, eggs, milk, oil, and grated cheese. The tapioca flour gives it a chewy texture and makes it gluten-free.
2. Is Pão de Queijo gluten-free?
Yes! Since it uses tapioca flour instead of wheat flour, it’s 100% gluten-free and suitable for those with celiac disease or gluten sensitivity.
3. Can I freeze Brazilian cheese bread?
Absolutely. You can freeze the raw batter in muffin tins or freeze baked rolls. Both reheat well, making them perfect for make-ahead meals.
4. What kind of cheese should I use?
Traditionally, it’s made with Queijo Minas, but Parmesan, mozzarella, cheddar, or a combination works great. Sharp cheeses give more flavor.
5. Can I use regular flour instead of tapioca?
No—substituting regular flour will not work. Tapioca flour gives Pão de Queijo its unique chewy texture and is essential to the recipe.
6. Why is my Pão de Queijo flat or dense?
Common reasons include using cold ingredients, overmixing, or not enough cheese. Make sure the oven is fully preheated and avoid letting the batter sit too long.
7. Do I need a blender to make it?
A blender or food processor makes the easy version quick, but you can also mix by hand—just make sure to combine everything thoroughly.
Print
Easy Brazilian Cheese Bread (Pão de Queijo)
Description
These Easy Brazilian Cheese Breads (Pão de Queijo) are a classic Brazilian snack that’s naturally gluten-free and irresistibly cheesy! Made with tapioca flour, eggs, milk, oil, and your favorite grated cheese, they’re crispy on the outside and perfectly chewy on the inside. This blender-based version is quick to prepare and perfect for breakfast, snacks, parties, or serving alongside coffee or soups. Whether you’re new to Brazilian cuisine or already a fan, this recipe is a simple and satisfying way to bring a little South American flavor into your kitchen.
Ingredients
- 1 large egg, room temperature
- 1/3 cup extra virgin olive oil, plus more for greasing the pan
- 2/3 cup milk
- 1 1/2 cups (170 g) tapioca flour
- 1/2 cup (66 g) packed grated or crumbled cheese, your preference
- 1 teaspoon salt (or more to taste)
Instructions
-
Preheat the oven and prepare a mini muffin tin:
Preheat the oven to 400°F. Spread a small amount olive oil around the insides of each well of a non-stick mini muffin tin.
-
Blend the ingredients:
Put all of the ingredients into a blender and pulse until smooth. You may need to use a spatula to scrape down the sides of the blender so that everything gets blended well.
-
Pour into the mini muffin tin:
Pour the batter into the prepared mini muffin tin not quite to the top; leave about 1/8 inch from the top.
-
Bake:
Bake at 400°F in the oven for 15-20 minutes until all puffy and nicely browned. Remove from the oven and let cool on a rack for a few minutes.
Eat while warm or at room temperature (they’re best when fresh). Note that Brazilian cheese bread is very chewy, sort of like Japanese mochi.
Store leftovers in an airtight container at room temperature for 1 day or in the fridge for 1 week. Reheat for several seconds in the microwave or for a 1 to 2 minutes in the toaster oven before serving. They can also be frozen for up to 1 month and reheated in a toaster oven or low oven until thawed and crisp.
Notes
-
Cheese Options: Traditional Brazilian Queijo Minas is ideal, but Parmesan, mozzarella, cheddar, or a mix of cheeses work beautifully. Sharp cheeses add a bold flavor, while mozzarella makes them stretchier and softer.
-
Tapioca Flour: Tapioca flour (also called cassava or manioc starch) is essential—do not substitute with regular flour. It gives the bread its signature chewy texture and keeps it gluten-free.
-
Pan Size: Mini muffin pans work best for bite-sized Pão de Queijo. Standard muffin pans can be used for larger rolls—just increase the baking time slightly.
-
Make Ahead: You can refrigerate the batter for up to 2 days or freeze the unbaked batter in muffin cups and bake directly from frozen.
-
Storage: Store baked rolls in an airtight container at room temperature for 2 days or refrigerate for up to 5. Reheat in the oven or air fryer for best results.
-
Flavor Variations: Add garlic powder, herbs (like rosemary or oregano), chili flakes, or even stuff with ham or guava paste for fun twists.


")