

Cozy Crockpot Apple Cider: A Fall Favorite You’ll Love
There’s something magical about fall. The crisp air, the golden leaves, and the unmistakable coziness that comes with it. But if there’s one thing that truly completes the season, it’s the aroma of warm spices wafting through your home. And what better way to achieve that than with a batch of homemade Crockpot Apple Cider?
This easy recipe is perfect for cozy nights, holiday gatherings, or any time you want to embrace that autumnal vibe. Plus, it’s incredibly simple to make. Just toss everything into a crockpot, let it simmer, and voilà—you’ve got a comforting, spiced drink that’s like a hug in a mug. And the best part? Your entire house will smell like fall heaven.
Why Homemade Apple Cider?
Store-bought apple cider is fine, but homemade apple cider? It’s a whole different experience. You get to control the sweetness, adjust the spices to your liking, and create something that feels personal and special. Plus, there’s something deeply satisfying about knowing you made it yourself—with fresh, real ingredients.
For this recipe, I recommend using a mix of apples. Combining sweet varieties like Gala or Fuji with tart ones like Granny Smith adds layers of flavor that make this cider truly stand out. And yes, we’re keeping the peels and cores on the apples—don’t worry, it all gets strained out later, and those bits add so much depth to the cider.
The Ingredients You’ll Need
Let’s start by gathering everything you’ll need to whip up this seasonal favorite:
- 10 medium apples (a mix of sweet and tart, like Gala, Fuji, and Granny Smith)
- 1 orange, sliced
- 4 cinnamon sticks
- 1 tablespoon whole cloves
- 1 tablespoon allspice berries
- ½ cup brown sugar (adjust to taste)
- 10 cups water
The ingredient list is simple, but don’t let that fool you—these basics come together to create something truly magical.
How to Begin
Step 1: Prep the Apples

Start by washing your apples thoroughly. Since we’re leaving the peels and cores intact (they add flavor and natural sweetness), it’s important to give them a good scrub. Once they’re clean, quarter the apples. No need to stress about perfection here—just chop them up and you’re good to go.
Step 2: Add the Citrus and Spices
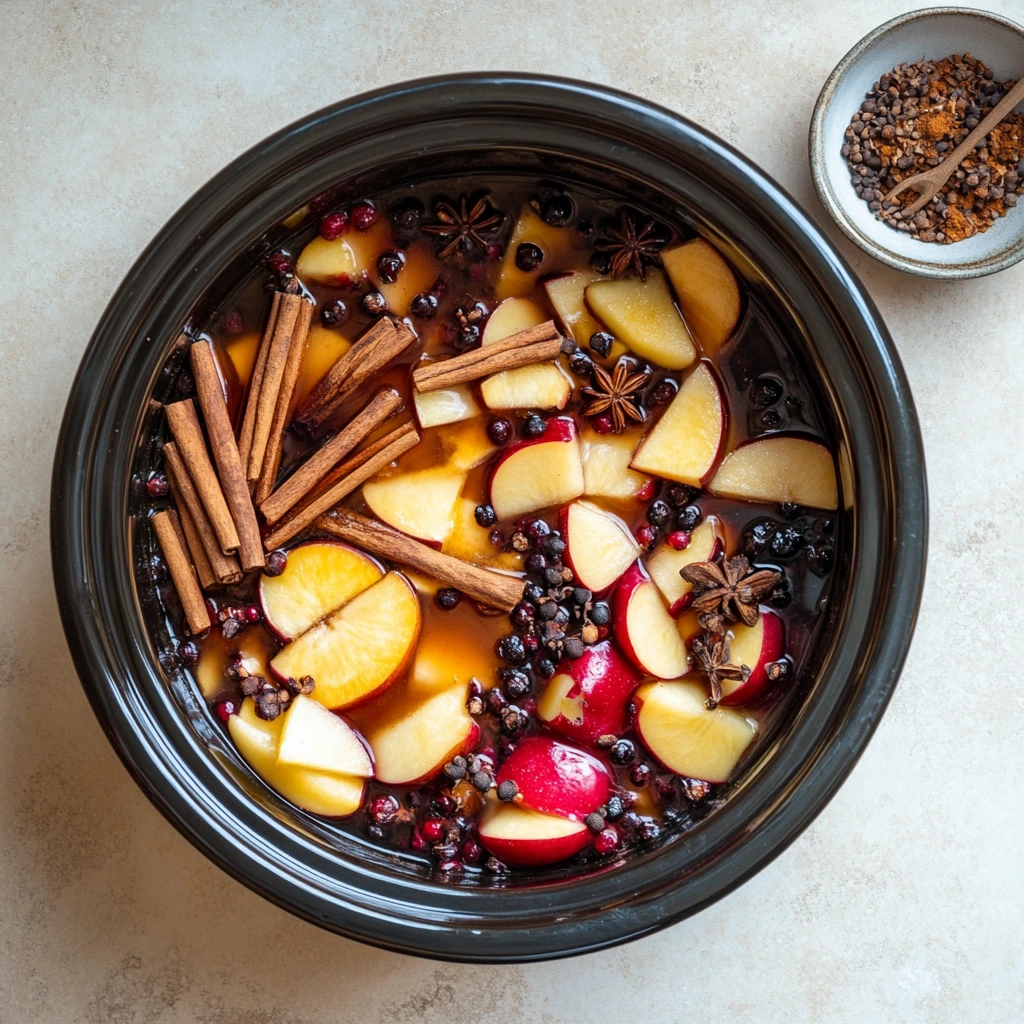
Next, place your apple quarters and orange slices into your crockpot. The orange adds a hint of brightness that complements the apples beautifully. Toss in the cinnamon sticks, whole cloves, and allspice berries. These spices are the heart and soul of your cider, infusing it with warmth and depth.
Step 3: Pour in the Water
Now, pour in 10 cups of water. It should be enough to fully submerge the fruit and spices. If your crockpot isn’t big enough, don’t worry—just add as much water as you can. The flavors will still come together beautifully.
Let the Magic Happen

Cover the crockpot and set it to high for 3–4 hours or low for 6–8 hours. As it simmers, your kitchen will be filled with the most inviting aroma—a mix of apples, cinnamon, and that unmistakable coziness of fall spices. It’s like lighting a seasonal candle, but better because you can drink it.
So, go about your day while your crockpot does its thing. Whether you’re decorating pumpkins, binging your favorite fall movies, or simply relaxing with a good book, you’ll love knowing that a delicious mug of apple cider is waiting for you.
Finishing Your Perfect Crockpot Apple Cider
By now, your crockpot has done most of the hard work, and your home smells like the coziest autumn dream. But we’re not quite done yet! The next steps are where the magic happens—bringing out all those delicious flavors and transforming your ingredients into a warm, spiced apple cider that will have everyone asking for seconds.
Mash and Extract the Goodness
Step 4: Mash the Fruit
Once the apples and orange slices are soft and fragrant, it’s time to release all their juices. Grab a potato masher or the back of a large spoon and gently mash the fruit directly in the crockpot. Don’t worry if it looks messy; that’s a good sign you’re getting every bit of flavor out of the apples and spices.
This step not only intensifies the flavors but also ensures your cider has that rich, authentic taste that store-bought versions simply can’t compete with.
Strain and Sweeten
Step 5: Strain the Mixture
Now that your fruit is thoroughly mashed, it’s time to separate the liquid gold from the solids. Carefully ladle the mixture into a fine mesh strainer placed over a large bowl or pot. You can also use cheesecloth if you have it on hand—it works beautifully for catching smaller bits of pulp and spices.
Press the solids firmly with the back of a spoon or ladle to extract every last drop of liquid. You’ll be left with a pot of beautifully spiced cider, ready for its finishing touches.
Pro Tip: If you want an extra-clear cider, strain the liquid twice—first through a fine mesh strainer and then through cheesecloth.
Step 6: Sweeten to Taste
Pour your cider back into the crockpot or a large pot on the stove, and stir in ½ cup of brown sugar. This amount adds a subtle sweetness that enhances the natural flavors of the apples and spices. If you prefer a less sweet cider, start with less sugar and taste as you go.
Want to mix things up? Try swapping brown sugar for honey, maple syrup, or even agave nectar for a unique twist.
Time to Serve
With your cider sweetened and ready to go, it’s time for the best part—serving it up!
Step 7: Garnish and Enjoy
Ladle the warm cider into mugs and get creative with your garnishes. Here are a few ideas to elevate your presentation:
- A cinnamon stick for stirring and an extra hint of spice.
- A thin slice of orange for a pop of color and citrusy flair.
- A dollop of whipped cream and a drizzle of caramel for a decadent treat.
Creative Variations
If you’re feeling adventurous, here are some fun ways to customize your cider:
- Ginger Kick: Add a few slices of fresh ginger for a spicier, warming cider.
- Vanilla Bliss: Stir in a teaspoon of vanilla extract for a sweet, creamy flavor.
- Adult-Friendly: Spike your cider with a splash of bourbon, rum, or spiced whiskey for a festive cocktail.
Storage and Reheating
One of the best things about homemade apple cider is that it stores beautifully, making it perfect for prepping ahead of time or enjoying leftovers.
- Refrigerate: Let your cider cool completely before transferring it to an airtight container. It will keep in the fridge for up to a week.
- Freeze: Pour cooled cider into a freezer-safe container, leaving some space at the top for expansion. Freeze for up to three months.
- Reheat: Warm your cider gently on the stove or in the microwave. If reheating a larger batch, do it in the crockpot on low to maintain its rich, spiced flavor.
At this point, your Crockpot Apple Cider is ready to take center stage at any fall gathering or cozy night in. Whether you’re serving it to friends and family or keeping the batch all to yourself (no judgment here), it’s a guaranteed crowd-pleaser.
FAQs and Wrapping Up Your Cozy Cider Experience
You’ve mastered the art of making Crockpot Apple Cider, and now it’s time to answer some common questions, share helpful tips, and wrap up this warm and inviting recipe. Whether you’re a seasoned cider enthusiast or a first-timer, these FAQs will ensure your batch is the best it can be.
Frequently Asked Questions
1. Can I use a different combination of apples?
Yes! Using a mix of sweet and tart apples is the key to a balanced cider, but feel free to experiment with your favorites. Honeycrisp, Pink Lady, or even Red Delicious can all add unique flavors to your cider.
2. Can I make this recipe on the stovetop instead of a crockpot?
Absolutely! Use a large pot and simmer the ingredients over low heat for 2–3 hours. Stir occasionally to prevent sticking, and follow the same mashing and straining steps once the fruit is soft.
3. How do I make this cider less sweet?
If you prefer a tarter cider, reduce or skip the brown sugar altogether. The natural sweetness of the apples will still shine through, and you can always add a touch of honey or maple syrup later if needed.
4. Can I prepare this cider ahead of time for a party?
Yes! Crockpot Apple Cider is perfect for make-ahead prep. Store it in the refrigerator for up to a week, then reheat it in your crockpot or on the stove before serving.
5. What can I do with the leftover solids?
The leftover apple and orange pulp can be repurposed into apple butter, added to smoothies, or composted for an eco-friendly option.
6. Can I freeze leftover cider?
Definitely! Freeze your cider in airtight containers, leaving some room for expansion. It’ll keep for up to three months. Thaw and reheat when you’re ready to enjoy it again.
7. How can I make this recipe kid-friendly and festive?
Keep the cider alcohol-free, and let kids customize their mugs with fun garnishes like whipped cream, cinnamon sugar, or a candy cane for holiday flair.
Conclusion: A Sip of Fall Magic
Congratulations—you’ve just made a batch of the coziest, most delicious Crockpot Apple Cider! This recipe is more than just a drink; it’s an experience that brings the essence of fall into your home. From the sweet apples to the warm spices, every sip is like a little reminder to slow down and enjoy the season.
Whether you’re hosting a party, cuddling up on the couch, or sharing a special moment with loved ones, this cider is the perfect companion. It’s easy to customize, simple to prepare, and endlessly comforting.
I’d love to hear how your cider turned out! Did you add any unique twists? Leave a comment below to share your experience, and don’t forget to tag me in your cozy cider moments on social media.
Cheers to making memories, savoring fall, and sipping something magical. 🍎🍂☕
Now, grab a mug, wrap yourself in a warm blanket, and enjoy! You’ve earned it.
Print
Cozy Crockpot Apple Cider Recipe: A Simple and Delicious Fall Treat
Description
Bring the flavors of fall into your home with this simple and delicious Crockpot Apple Cider recipe. A mix of sweet and tart apples, citrus, and warm spices come together to create the perfect seasonal drink. Whether you’re hosting a gathering, preparing for the holidays, or just want a cozy treat, this cider is a must-try. It’s easy to customize, smells incredible while it cooks, and can be served warm or cold.
Ingredients
- 10 medium apples (a mix of sweet and tart varieties like Gala, Fuji, and Granny Smith)
- 1 orange, sliced
- 4 cinnamon sticks
- 1 tablespoon whole cloves
- 1 tablespoon allspice berries
- ½ cup brown sugar (adjust to taste)
- 10 cups water
Instructions
- Prepare the Apples and Orange: Wash and quarter the apples, leaving the peels and cores intact. Slice the orange into thin rounds.
- Add to the Crockpot: Place the apples, orange slices, cinnamon sticks, cloves, and allspice berries into the crockpot.
- Add Water: Pour in 10 cups of water, ensuring the fruit and spices are fully submerged.
- Cook: Cover the crockpot and cook on high for 3–4 hours or low for 6–8 hours, until the fruit is very soft and fragrant.
- Mash the Fruit: Use a potato masher or large spoon to mash the apples and orange slices, releasing their juices.
- Strain the Mixture: Pour the cider through a fine mesh strainer or cheesecloth into a large bowl or pot, pressing the solids to extract all the liquid.
- Sweeten: Stir in brown sugar, adjusting to taste. Mix until dissolved.
- Serve: Ladle the warm cider into mugs. Garnish with a cinnamon stick or orange slice if desired.
Notes
- Spice Options: Place cloves and allspice in a spice sachet or cheesecloth for easier removal.
- Adjust Sweetness: Taste the cider before adding sugar, as the sweetness of your apples can vary.
- Storage: Store leftover cider in an airtight container in the refrigerator for up to a week or freeze for up to three months.
- Reheating: Warm leftovers on the stove or in the crockpot to maintain the flavor.
- Variations: Add a splash of vanilla extract or a few slices of fresh ginger for a unique twist.


")