A Slice of History – Making Traditional Lardy Cake at Home
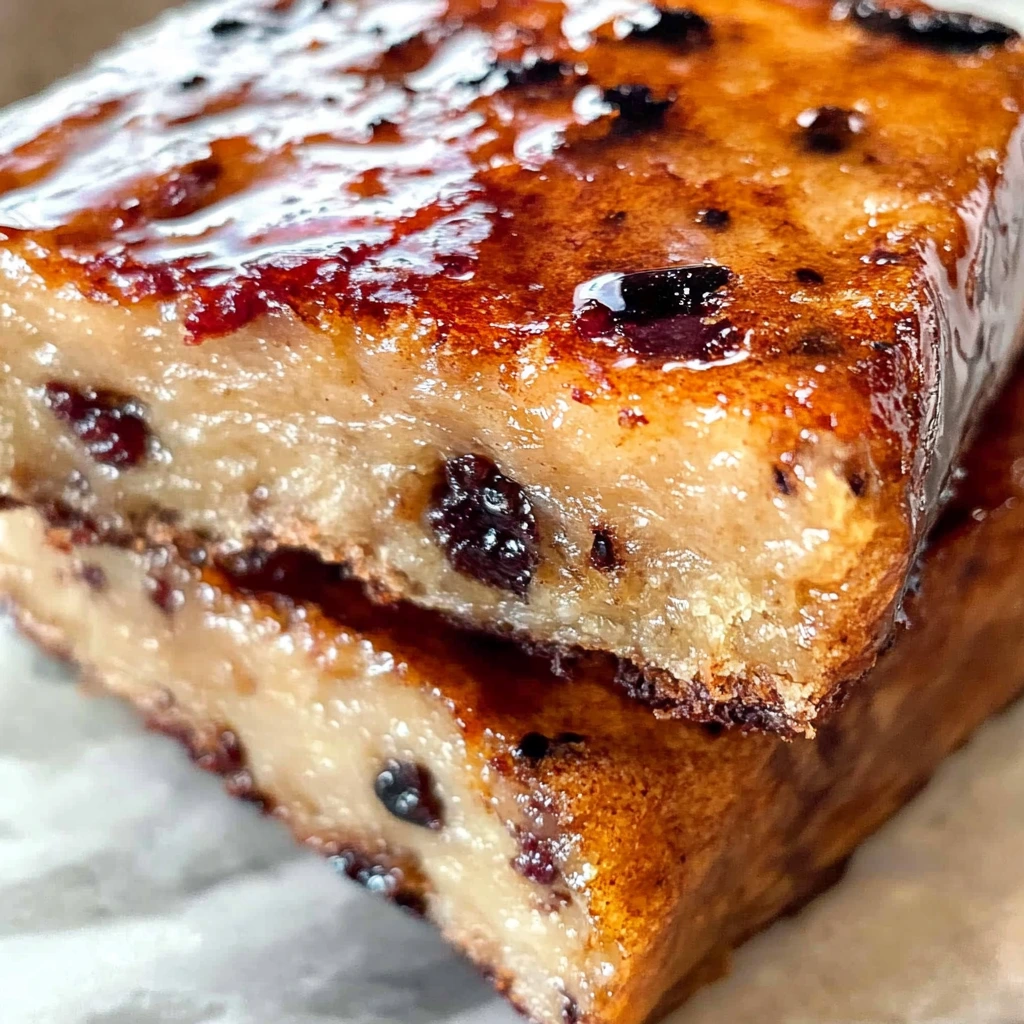
If you’ve never had a proper Lardy Cake, you’re in for a rich and flaky treat steeped in British baking history. Think of it as a cross between a sweet bread and a spiced pastry—filled with dried fruit, cinnamon, and buttery (well, lardy) layers that melt in your mouth.
Hey there! Today I’m so excited to share something extra special: a recipe that goes way beyond the usual traybakes and tea cakes. This Classic Lardy Cake is one of those old-fashioned bakes that might not be in every cookbook anymore, but it absolutely deserves a place on your kitchen table.
Originating from the southern counties of England—Wiltshire, Hampshire, and beyond—lardy cake is a traditional celebration bread, baked for fairs and holidays. And yes, the star ingredient is lard. While it might raise eyebrows today, lard gives the cake its signature flaky layers and unbeatable richness. It’s what makes this bake truly authentic.
📝 Ingredients You’ll Need
For the Dough:
-
150g lard (cold and cubed)
-
500g strong white flour
-
1 tsp salt
-
75g caster sugar
-
10g fast-action yeast
-
200ml lukewarm milk
-
50ml water
For the Filling:
-
75g brown sugar
-
1 tsp ground cinnamon
-
1 tsp ground mixed spice
-
200g dried mixed fruit (currants, sultanas, raisins, or a combo)
🧑🍳 Step 1: Activate the Yeast
Start by dissolving the yeast and caster sugar in the lukewarm milk. Give it a good stir and let it sit for about 10 minutes, or until it starts to foam. This step kickstarts the rising process and gives the dough its lovely lift.
🌾 Step 2: Make the Dough
In a large mixing bowl, sift together the flour and salt. Add the cold lard chunks and rub them in with your fingertips until the mixture looks like breadcrumbs. This will take a few minutes, but it’s worth doing properly.
Pour in your frothy yeast mixture, then slowly add the 50ml water, mixing as you go, until a soft dough forms. You may not need all the water—just go until it comes together.
Now comes the fun (and a bit of a workout): knead the dough for about 10 minutes until it’s smooth and elastic. You can do this by hand or in a stand mixer with a dough hook.
🍽 Step 3: First Proof
Place your dough in a clean bowl, cover it with a damp tea towel, and let it rise in a warm spot for about 1 hour, or until it’s doubled in size. This is when all those yeasty bubbles get to work.
In Part 2, we’ll roll, fill, and layer the dough to give you that beautifully spiced and sticky texture Lardy Cake is famous for.
Fold, Fill, and Bake – The Magic of Lardy Layers
After your dough has puffed up nicely, it’s time to turn it into the flaky, fruit-studded masterpiece we know and love.
🍯 Step 4: Roll and Fill
Turn the dough out onto a floured surface and roll it into a rectangle—roughly 30x40cm is perfect.
In a small bowl, mix your brown sugar, cinnamon, and mixed spice. Sprinkle this spicy sugar mix evenly over the dough. Then scatter the dried fruit across the surface.
🥄 Step 5: Fold and Layer
Here’s where Lardy Cake gets its signature texture. Fold the dough like a letter—top third down, bottom third up. Turn it 90 degrees, then roll it out again into a rectangle. Repeat this folding and rolling process 2–3 times to create flaky layers (similar to puff pastry).
🍞 Step 6: Second Proof
Grease and line a 23cm square baking tin. Gently press your folded dough into the tin, tucking it to fit if needed. Cover it again with a tea towel and let it rise for another 30 minutes.
🔥 Step 7: Bake Until Golden
Preheat your oven to 180°C (fan). Bake the Lardy Cake for 25–30 minutes, or until golden brown and beautifully risen. You’ll know it’s done when it smells like a warm, spiced bakery.
🧈 Optional Finishing Touch
Once baked, let it cool for 10 minutes before removing it from the tin. For extra indulgence, you can brush the top with a bit of melted lard or butter—it adds a glossy finish and even more richness.
💡 Tips and Twists
-
For a glazed finish, dust with icing sugar or brush with honey while warm.
-
Make it festive by adding chopped candied peel or a splash of brandy to the filling.
-
Swap lard for butter if preferred, but the texture won’t be quite the same.
Let’s move on to the FAQs and wrap things up with everything you need to recreate this comforting British bake at home.
FAQs + Final Thoughts
❓ Frequently Asked Questions
1. Can I use butter instead of lard?
Yes, but the texture will be more like a sweet bread than a flaky lardy cake. Lard gives it that signature softness and richness.
2. Is this cake overly sweet?
Not at all—it’s sweet, but balanced by the spices and rich dough. It’s a perfect teatime treat.
3. Can I make this in advance?
Yes! It keeps well for 2–3 days in an airtight container. Warm it slightly before serving for best results.
4. Can I freeze lardy cake?
Absolutely. Once baked and cooled, slice and freeze in an airtight container for up to a month.
5. Why is it called “lardy” cake?
The name comes from the generous use of lard in the dough and layering process—don’t worry, it tastes amazing!
6. What’s the best way to serve it?
With a cup of strong tea. It’s also delicious slightly warmed with a drizzle of cream or a scoop of vanilla ice cream.
❤️ Final Thoughts: A Comforting Classic with Timeless Appeal
This Classic Lardy Cake is more than just a recipe—it’s a delicious dive into British baking heritage. Rich, flaky, and bursting with spice and fruit, it’s the kind of treat that fills your kitchen with the most comforting aromas and brings everyone to the table.
It might not be the most common bake nowadays, but trust me—it’s one worth reviving. If you’ve never tried lardy cake before, now’s the time. And if it brings back memories of home, old bakeries, or family gatherings—then this recipe has done its job.
Print
Classic Lardy Cake – Flaky, Spiced, and Rich with Tradition
- Total Time: 2 hours
Description
Classic Lardy Cake is a traditional British recipe made with rich dough, spiced sugar, dried fruit, and generous layers of lard for its signature flaky texture. This comforting and indulgent bake hails from southern England and is the perfect sweet treat to enjoy with a cup of tea. It’s simple, rustic, and deeply nostalgic—exactly how a heritage recipe should be.
Ingredients
Dough:
-
150g lard (cold, cubed)
-
500g strong white flour
-
1 tsp salt
-
75g caster sugar
-
10g fast-action yeast
-
200ml lukewarm milk
-
50ml water
Filling:
-
75g brown sugar
-
1 tsp ground cinnamon
-
1 tsp mixed spice
-
200g dried mixed fruit (currants, sultanas, raisins)
Instructions
-
In a bowl, mix yeast and caster sugar into lukewarm milk. Let sit 10 mins until frothy.
-
Sift flour and salt into a large bowl. Rub in lard until crumbly.
-
Add yeast mixture and water. Mix to a soft dough. Knead for 10 mins.
-
Cover and prove 1 hour or until doubled in size.
-
Roll dough into 30x40cm rectangle. Sprinkle with mixed spice, sugar, and fruit.
-
Fold dough into thirds like a letter. Roll and fold 2–3 more times.
-
Place in greased 23cm square tin. Prove 30 minutes.
-
Bake at 180°C (fan) for 25–30 mins, until golden.
-
Cool 10 minutes. Optionally brush with melted lard or butter.
Notes
-
Lardy cake is best eaten fresh but improves in stickiness over a day or two.
-
Brush with honey for a glossy finish.
-
Swap out fruit mix for chopped dates or figs for variety.
- Prep Time: 1 hour 30 minutes
- Cook Time: 30 minutes


