

A Biryani Worth the Wait – Let’s Get Started!
There’s something truly magical about biryani – the aroma, the spice, the richness, and that moment you lift the lid to reveal layers of flavor just waiting to be devoured. If you’ve ever been intimidated by making biryani at home, don’t worry – I’ve broken it down step by step so you can confidently recreate this Mughlai masterpiece in your own kitchen.
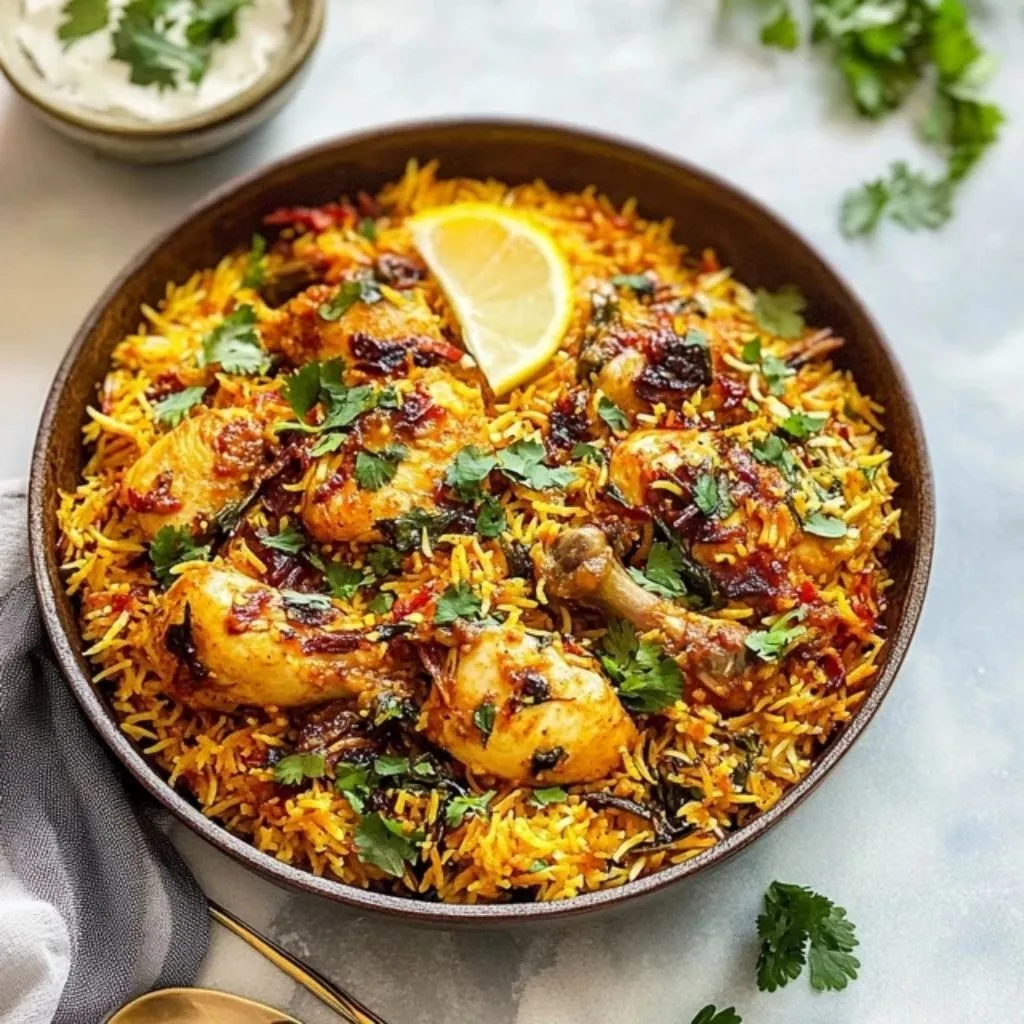
Today’s recipe is for Fragrant Chicken Biryani, cooked “dum style,” which means it’s slow-steamed under a tight seal to lock in all those beautiful aromas. We’re talking marinated chicken, parboiled basmati rice, golden caramelized onions, and a saffron-infused milk drizzle that ties everything together.
Whether you’re hosting guests or just treating yourself to a flavor-packed dinner, this biryani delivers on all fronts. Yes, it takes a bit of time, but trust me – every second is worth it.
Ingredients You’ll Need
Here’s everything laid out for you so you can prep with confidence:
For the Chicken Marinade:
-
1kg bone-in chicken thighs
-
200g yogurt (for tenderizing)
-
6 garlic cloves, minced
-
2 tbsp grated ginger
-
2 green chillies, slit
-
1 tbsp garam masala
-
1 tsp turmeric
-
1 tsp cumin
-
1 tsp salt
-
2 tbsp lemon juice
For the Rice:
-
400g basmati rice, soaked for 30 minutes
-
1.2 litres water
-
1 cinnamon stick
-
2 bay leaves
-
4 cardamom pods
-
1 tbsp salt
-
½ tsp saffron threads, soaked in 2 tbsp warm milk
For Layering:
-
3 onions, thinly sliced and fried until golden brown
-
½ cup chopped coriander
-
¼ cup chopped mint
-
50g ghee (clarified butter)
Step 1: Marinate the Chicken
Start by mixing all the marinade ingredients in a large bowl. Toss in your chicken thighs, making sure each piece is fully coated in the yogurt-spice mixture. This step is essential for building flavor from the inside out. Ideally, you want to marinate the chicken for at least 4 hours, but overnight will give you the best results.
TIP: If you’re short on time, a 2-hour marination will still do the trick – just know that the longer, the better!
Step 2: Parboil the Basmati Rice
While your chicken is marinating, prep your rice. Bring the 1.2 litres of water to a boil in a large pot and add the cinnamon stick, bay leaves, cardamom pods, and salt. Then, drain the soaked basmati rice and add it to the boiling water.
Cook the rice for about 7-8 minutes until it’s just about 70% done – it should be slightly firm to the bite. Then drain immediately and spread it out on a tray or plate to stop it from overcooking.
TIP: Overcooking the rice at this stage can lead to mushy biryani. Keep a close eye!
Step 3: Fry the Onions
This step makes all the difference – crispy, golden fried onions are what give biryani its signature flavor and aroma.
Thinly slice the onions and fry them in oil over medium heat until they’re deeply golden and caramelized. It takes a bit of patience, but don’t rush – this step is key.
TIP: Make extra fried onions and save them for garnish later – you won’t regret it.
Layer, Seal, and Steam – Bringing the Biryani to Life

Now that you’ve got your marinated chicken ready, your parboiled rice done, and your onions perfectly caramelized, it’s time for the most exciting part – the layering and dum cooking. This is where all those individual elements come together to form one flavorful, aromatic dish that’s truly greater than the sum of its parts.
Don’t worry – I’ll walk you through the steps so it’s all smooth sailing (or steaming, in this case)!
Step 4: Assemble the Layers
Grab your heaviest-bottomed pot with a tight-fitting lid – something like a Dutch oven or a thick stockpot works great here. If your lid doesn’t seal tightly, don’t worry. We’ll be using a foil seal to trap the steam inside.
Layering Order:
-
Base Layer – Marinated Chicken
Spread all the marinated chicken at the bottom of your pot in an even layer. You don’t need to pre-cook it; the chicken will cook through during the dum process, soaking up all those amazing flavors. -
Next – Fried Onions
Sprinkle about two-thirds of the fried onions over the chicken. The sweetness from the onions balances the spices and helps create that authentic Mughlai biryani profile. -
Fresh Herbs
Scatter half of the chopped coriander and mint over the onions. The herbs infuse freshness and elevate the aroma. -
Top – Parboiled Rice
Carefully add all of the parboiled rice on top of the herbs. Spread it evenly so the top is nice and flat. -
Final Touches
Drizzle the saffron milk all over the rice – this adds beautiful color and that unmistakable floral fragrance. Then, spoon over the ghee, letting it melt into the rice for added richness.
TIP: If you like an extra golden crust (known as “kurchan” in some biryani recipes), you can place a few drops of ghee on the bottom of the pan before adding the chicken layer.
Step 5: Seal and Dum Cook
Now it’s time to lock in the magic.
Sealing the Pot:
If your lid is tight-fitting, just close it up. If not, cover the top with a layer of foil before placing the lid on – this creates a sealed environment to trap the steam.
Dum Cooking:
-
Place the pot over medium heat for 5 minutes to get things going.
-
Then reduce the heat to low and let it cook gently for 45 minutes.
You’re essentially steaming the entire dish in its own juices. The rice finishes cooking, the chicken becomes tender, and all the layers meld together beautifully.
TIP: If you’re worried about burning the bottom, you can place a flat griddle (tava) or a heat diffuser under your pot during the dum stage.
Step 6: Let It Rest (Then Fluff!)
Once the 45-minute dum cooking is done, turn off the heat and let the biryani rest, covered, for another 10-15 minutes. This allows the steam to redistribute and makes it easier to fluff the rice without breaking it.
Use a long spoon or fork to gently fluff the rice, lifting from the sides to reveal all the layers. Be careful not to mash it – we want those grains to stay separate and light.
And there you have it – a pot full of fragrant, fluffy, flavor-packed biryani that’s ready to serve!
Serving Suggestions
This biryani is a complete meal on its own, but if you want to take it to the next level, serve it with:
-
Cucumber raita (yogurt + grated cucumber + cumin)
-
Boiled eggs, halved and sprinkled with chaat masala
-
A simple kaccha onion salad with lemon and salt
You’ll love how each bite hits different – spicy, savory, a little sweet from the onions, and that hint of saffron and herbs pulling it all together.
Quick Recap of Pro Tips:
-
Don’t skip marinating the chicken – flavor builds here.
-
Rice should be only 70% cooked before layering.
-
Fried onions make a huge difference – take your time with them.
-
Ghee + saffron = instant elevation in taste and aroma.
-
Dum cooking needs patience but delivers restaurant-style results.
Your Biryani Questions, Answered + Final Thoughts
By now, your kitchen is probably filled with the incredible aroma of saffron, caramelized onions, and those warm Indian spices that make biryani truly unforgettable. But before you dive in, let’s take a moment to cover some of the most frequently asked questions about making biryani at home – because let’s face it, as simple as this recipe is to follow, there are always a few tricky spots that trip people up.
Whether it’s your first time making biryani or you’re looking to improve your technique, these quick answers will help you feel more confident in your biryani game.
✅ Frequently Asked Questions (FAQ)
1. Can I use boneless chicken instead of bone-in thighs?
Absolutely. Boneless chicken works fine, especially thighs for juiciness. However, bone-in chicken brings more flavor to the dish during dum cooking, so if possible, stick with bone-in for the most authentic results.
2. My rice turned mushy. What went wrong?
This usually happens when the rice is overcooked before layering. Make sure the basmati is only 70% cooked (still firm in the center) when you drain it. Also, avoid over-stirring the final biryani when fluffing.
3. Can I make this ahead of time?
Yes, biryani actually tastes even better the next day! Store it in the fridge for up to 3 days and reheat gently, either in a pan on the stovetop or in the microwave with a splash of water and a cover to keep it moist.
4. What can I use instead of saffron?
If you don’t have saffron, you can skip it or use a pinch of turmeric in warm milk for color. It won’t have the same aroma, but it’ll still taste great. Just remember, saffron adds that special biryani finish!
5. Can I make this recipe vegetarian?
Absolutely! Replace the chicken with paneer, tofu, or mixed vegetables (like cauliflower, potatoes, peas, and carrots). You’ll still follow the same steps – just adjust the marination and cooking time accordingly.
6. How do I know when the chicken is fully cooked?
If you followed the dum cooking method properly (5 minutes on medium, 45 minutes on low), your chicken should be perfectly cooked through. To be extra sure, you can check one piece – it should be juicy and fall-off-the-bone tender.
7. Can I use store-bought fried onions?
Yes, in a pinch! While homemade gives the best flavor, good-quality store-bought fried onions can save time and still deliver decent results.
👩🍳 Final Thoughts: Make It Your Own
There’s something incredibly satisfying about making biryani from scratch. The layering process, the scent of saffron wafting through the kitchen, and that first forkful when everything just works—it’s the kind of dish that turns dinner into an experience.
What I love most about this Fragrant Chicken Biryani is how customizable it is. You can adjust the spice level to your taste, swap in different proteins or veggies, and tweak the toppings depending on what you have on hand. Whether you’re feeding a crowd or just treating yourself to something special, biryani always feels like a celebration on a plate.
And don’t stress if it’s not perfect the first time—this dish rewards practice. Every time you make it, you’ll get a better feel for the layering, the rice texture, and those signature biryani flavors.
💬 I’d Love to Hear from You!
If you tried this recipe, let me know how it turned out! Did you make any tweaks? Add hard-boiled eggs on top? Go heavier on the mint? Share your tips and variations in the comments—I always love hearing how others put their own spin on it.
And if you’re new to biryani, don’t forget to save this recipe for your next special dinner or weekend cooking project. Trust me—it’s the kind of dish that turns regular evenings into something memorable.
Happy cooking!
Print
Authentic Mughlai Chicken Biryani Recipe – Dum Style with Saffron Rice & Fried Onions
- Total Time: Approx. 1 hr 45 mins (excluding marination)
Description
This authentic Chicken Biryani Recipe (Dum Style) is a Mughlai-inspired masterpiece made by layering marinated chicken with fragrant basmati rice, saffron milk, fresh herbs, and crispy caramelized onions. Slow-cooked using the traditional “dum” method, this one-pot meal is packed with bold spices, rich aroma, and restaurant-worthy flavor. Whether it’s for a special occasion or a weekend dinner, this biryani brings the celebration to your table. Perfectly fluffy rice, tender chicken, and warming spices – it’s everything you love about biryani, made simple enough for home cooking.
Ingredients
For the Chicken Marinade:
-
1kg bone-in chicken thighs
-
200g plain yogurt
-
6 garlic cloves, minced
-
2 tbsp fresh ginger, grated
-
2 green chilies, slit
-
1 tbsp garam masala
-
1 tsp turmeric
-
1 tsp cumin
-
1 tsp salt
-
2 tbsp lemon juice
For the Rice:
-
400g basmati rice (soaked for 30 minutes)
-
1.2 litres water
-
1 cinnamon stick
-
2 bay leaves
-
4 green cardamom pods
-
1 tbsp salt
-
½ tsp saffron threads (soaked in 2 tbsp warm milk)
For Layering:
-
3 onions, thinly sliced
-
½ cup chopped coriander leaves
-
¼ cup chopped mint leaves
-
50g ghee (or butter)
Instructions
1. Marinate the Chicken:
In a large bowl, mix yogurt, garlic, ginger, green chilies, garam masala, turmeric, cumin, salt, and lemon juice. Add chicken thighs and coat well. Cover and refrigerate for at least 4 hours (overnight is best).
2. Fry the Onions:
Heat oil in a pan and fry sliced onions over medium heat until golden brown and caramelized. Remove and drain on paper towels.
3. Parboil the Rice:
In a large pot, bring water to a boil. Add cinnamon stick, bay leaves, cardamom, and salt. Drain the soaked rice and add it to the pot. Cook for 7–8 minutes until 70% done. Drain and spread on a tray to cool slightly.
4. Layer the Biryani:
In a heavy-bottomed pot, spread the marinated chicken as the base. Add two-thirds of the fried onions, half the coriander, and half the mint. Top with parboiled rice. Drizzle saffron milk and ghee over the rice.
5. Dum Cooking:
Seal the pot tightly with foil and a lid. Cook over medium heat for 5 minutes, then reduce to low heat and cook for 45 minutes. Let it rest (covered) for 10–15 minutes before fluffing gently and serving.
Notes
-
Bone-in chicken is recommended for the richest flavor, but boneless thighs can be used.
-
Don’t skip the saffron if possible—it really enhances the aroma and authenticity.
-
If your lid isn’t tight-fitting, use foil under the lid to seal in the steam.
-
Leftovers keep well in the fridge for up to 3 days and reheat beautifully.
- Prep Time: 45 minutes (excluding marination)
- Marination Time: 4 hours (or overnight)
- Cook Time: 1 hour


")