


Introduction & Beginning of the Recipe
Have you ever found yourself craving something hearty, buttery, and downright comforting, but didn’t want to spend hours fussing in the kitchen? Same here. That’s exactly why I love making Traditional Irish Potato Bread, also known as Potato Farls. It’s one of those magical recipes that turns simple, humble ingredients into something absolutely amazing—crispy on the outside, soft and fluffy on the inside, and so satisfying you’ll wonder why you didn’t make a double batch.
I first discovered farls years ago on a trip to Northern Ireland. There was this tiny café tucked away off a cobblestone street, and the aroma of buttery potatoes frying on a griddle literally pulled me inside. One bite of that fresh-off-the-pan farl, and I was hooked for life! Ever since then, this recipe has been a staple in my kitchen—especially for cozy weekends or big breakfasts.
Alright, enough reminiscing. Let’s get you set up with everything you’ll need!
Ingredients:
-
Potatoes: 750g (about 1.5 pounds) of a floury variety like Maris Piper, peeled and boiled
-
Butter: 30g (melted) – plus a little extra for frying
-
Plain Flour: 225g
-
Salt: A pinch (skip this if your butter is already salted)
-
Olive Oil: For frying (about 1 tablespoon)
Pro Tip: If you’ve got leftover mashed potatoes in the fridge, you’re halfway there already. Just measure out about 3 cups!
Step 1: Prep the Potatoes
First things first, you need silky smooth mashed potatoes. Boil your peeled potatoes in salted water until they’re tender enough to mash easily. Drain them really well—extra moisture is your enemy here. Then, mash them until they are as lump-free as you can get. You want that mashed potato velvety.
💬 Quick Tip: If you can, let the mashed potatoes cool a little bit. Warm potatoes work best when mixing with flour, but if they’re too hot, they can make the dough sticky and tricky to handle.
Step 2: Make the Dough
In a big mixing bowl, combine your mashed potatoes with the melted butter. Add in the flour and a pinch of salt. Stir it all together until it forms a soft dough. You might want to get your hands involved here—it’s the best way to tell if the dough is too sticky or just right.
If it feels too wet, sprinkle in a tiny bit more flour. The goal is a dough that’s soft, pliable, and easy to shape without clinging to your fingers.
Shaping, Cooking, and Tips

Step 3: Shape the Farls
Lightly dust your countertop with flour. Divide your dough into 4 equal parts (no need to be super exact—just eyeball it). Roll each ball into a circle about 1cm thick. Then, cut each circle into 4 wedges—kind of like slicing a pizza. These little triangle shapes are your “farls,” which comes from the Gaelic word for “four parts.”
💬 Little Note: Don’t stress about perfect shapes. Rustic is totally charming—and it’s how the grandmothers in Ireland have been doing it for generations!
Step 4: Griddle to Golden Perfection
Heat a large frying pan or flat griddle over medium heat. Add about 1 tablespoon of olive oil and 1 tablespoon of butter. Once it’s nice and hot (but not smoking), pop in a few farls. Cook them for about 4-5 minutes per side, or until they’re beautifully golden and a little crispy.
You might need to work in batches depending on the size of your pan. If needed, add a little more butter and oil between batches to keep everything luscious and flavorful.
💬 Pro Griddling Tip: Press down gently with a spatula once you flip them—this helps them cook evenly and get that signature golden crust.
Tips for Perfect Farls:
✔ Use floury potatoes like Maris Piper or Russets. Waxy potatoes won’t give you that soft, tender texture.
✔ Don’t over-flour the dough—too much flour can make your farls dense instead of fluffy.
✔ Serve hot straight off the griddle. They’re at their absolute best fresh and warm.
✔ Get creative: Add a handful of shredded cheese or some chopped chives into the dough for a fun twist!
Serving Suggestions:
-
Traditional Ulster Fry: Bacon, eggs, soda bread, and farls—breakfast of champions.
-
On the Side: Serve with stews or soups for a comforting Irish twist.
-
Toast the Next Day: If you have leftovers (big IF), slice and toast them for a quick, tasty snack.
FAQ Section & Conclusion
FAQ Section:
Q1: Can I use instant mashed potatoes?
You technically can, but for the best flavor and texture, real potatoes are the way to go. Instant mash can sometimes make the farls gummy.
Q2: Can these be made ahead of time?
Yes! You can shape the farls, wrap them tightly in plastic wrap, and refrigerate for up to 24 hours before cooking.
Q3: How do I store leftovers?
Cool them completely, then keep them in an airtight container in the fridge. Reheat in a toaster or skillet for best results.
Q4: Can I freeze potato farls?
Absolutely. Freeze them after cooking. When you’re ready to eat, just reheat from frozen in a skillet or toaster oven.
Q5: What other flavors can I add?
Cheese, chives, scallions, or even a pinch of garlic powder all work beautifully in the dough.
Q6: Do I need a special griddle pan?
Nope! A regular non-stick frying pan works perfectly fine.
Q7: Why are they called “farls”?
“Farl” comes from the Gaelic word for “four parts,” because each circle of dough is cut into four wedges.
Conclusion
There you have it—Traditional Irish Potato Farls that are as cozy and comforting as a big hug on a rainy day. I seriously can’t get enough of that buttery, crispy outside and the soft, tender inside. They’re simple, homey, and pure Irish magic.
Whether you’re whipping these up for a big weekend breakfast or serving them alongside a hearty stew, I promise they’ll disappear faster than you can say “top of the morning!” 😉
If you give this recipe a try, I’d love to hear how it goes. Drop a comment below or share your photos—especially if you add your own twist with some cheese or herbs! Happy griddling!
Print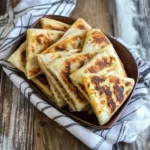
Authentic Irish Potato Bread (Farls) Recipe – Crispy Outside, Fluffy Inside!
- Total Time: 35 minutes
Description
Learn how to make Traditional Irish Potato Bread (Farls) with simple ingredients like mashed potatoes, butter, and flour. These soft, buttery farls are crispy on the outside and fluffy inside—perfect for breakfast, served alongside stews, or enjoyed fresh off the pan. This easy recipe comes together quickly and brings a taste of Ireland right into your kitchen.
Ingredients
-
750g potatoes (floury type like Maris Piper), peeled and boiled
-
30g butter, melted (plus extra for frying)
-
225g plain flour
-
1 pinch salt (optional if using salted butter)
-
1 tbsp olive oil (for frying)
Instructions
-
Prep the Potatoes:
Boil the peeled potatoes in salted water until tender. Drain thoroughly and mash until completely smooth and lump-free. -
Make the Dough:
In a large bowl, mix the warm mashed potatoes with melted butter. Add flour and salt, and stir until a soft dough forms. -
Shape the Farls:
On a floured surface, divide the dough into 4 balls. Roll each ball into a 1cm-thick circle and cut each into quarters (farls). -
Griddle the Farls:
Heat a frying pan or griddle over medium heat. Add 1 tbsp olive oil and 1 tbsp butter. Fry the farls for 4–5 minutes per side until golden brown and slightly crispy. Work in batches if needed. -
Serve:
Serve immediately with butter, or pair with a traditional Irish breakfast or hearty stew.
Notes
-
Leftover Mash: You can use 3 cups of leftover mashed potatoes. Adjust the flour slightly if the dough is too sticky.
-
Serving Tip: Farls are best served hot but can be reheated in a toaster or skillet.
-
Flavor Variations: Try adding shredded cheese, chopped chives, or scallions into the dough for an extra flavor boost.
-
Storage: Store leftovers in an airtight container in the fridge for up to 2 days. Freeze cooked farls for up to 2 months.
- Prep Time: 20 minutes
- Cook Time: 15 minutes


")